


Oreo Cheesecake Cookies
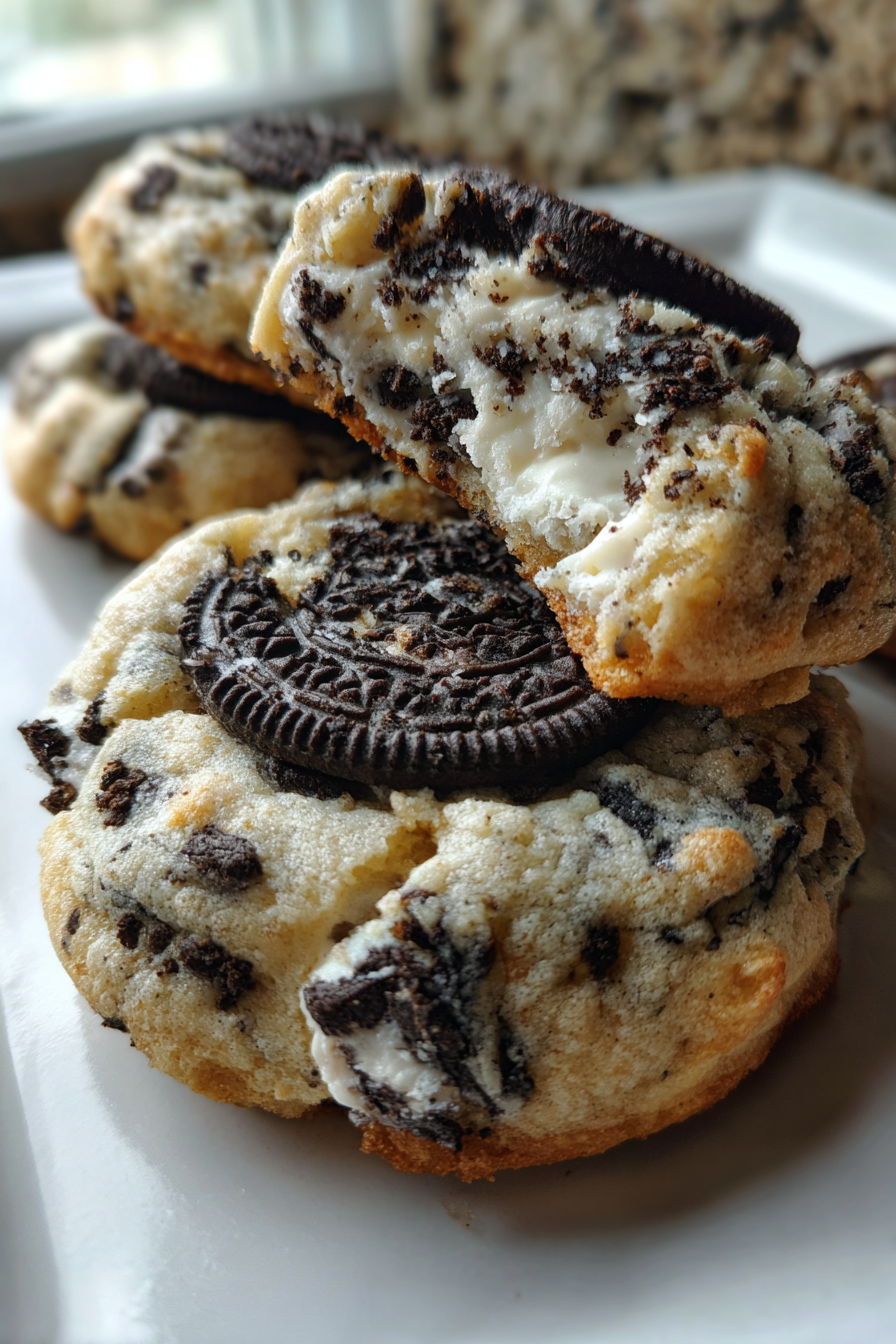
Are you ready to indulge in a delightful treat that combines the best of both worlds? These Oreo Cheesecake Cookies are a heavenly blend of creamy cheesecake and crunchy Oreo goodness, making them the perfect dessert for any occasion. Whether you’re a busy mom looking for a quick solution to satisfy your family’s sweet tooth or a professional wanting to impress guests at your next gathering, these cookies are sure to be a hit. With their rich flavor and soft texture, they’re not just cookies; they’re a little piece of happiness in every bite!
Why You’ll Love This Oreo Cheesecake Cookies
These Oreo Cheesecake Cookies are not only easy to make, but they also deliver a burst of flavor that will leave everyone asking for more. With just a handful of ingredients and minimal prep time, you can whip up a batch in no time. Plus, they’re perfect for sharing at family gatherings or enjoying as a sweet treat after a long day. Trust me, your taste buds will thank you!
Ingredients for Oreo Cheesecake Cookies
To create these scrumptious Oreo Cheesecake Cookies, you’ll need a few simple ingredients that you might already have in your pantry. Here’s what you’ll need:
- Cream Cheese: This adds that rich, creamy texture that makes these cookies taste like cheesecake.
- Unsalted Butter: Softened butter helps create a tender cookie base. Using unsalted allows you to control the saltiness.
- Granulated Sugar: Sweetens the cookies and contributes to their chewy texture.
- Large Egg: Acts as a binder, helping to hold everything together while adding moisture.
- Vanilla Extract: Enhances the overall flavor, giving a warm, inviting aroma to the cookies.
- All-Purpose Flour: The main structure of the cookies, providing the right balance of softness and chewiness.
- Baking Powder: A leavening agent that helps the cookies rise slightly, making them light and fluffy.
- Salt: Just a pinch to enhance the sweetness and balance the flavors.
- Crushed Oreo Cookies: The star of the show! These add a delightful crunch and chocolatey flavor that pairs perfectly with the cheesecake base.
For those looking to mix things up, consider using double-stuffed Oreos for an extra creamy bite or adding a sprinkle of chocolate chips for added indulgence. You can find all the exact measurements for these ingredients at the bottom of the article, ready for printing!
How to Make Oreo Cheesecake Cookies
Making these Oreo Cheesecake Cookies is a breeze! Follow these simple steps to create a batch of cookies that will have everyone coming back for seconds. Let’s dive into the deliciousness!
Step 1: Preheat the Oven
Start by preheating your oven to 350°F (175°C). Preheating is crucial because it ensures that your cookies bake evenly and achieve that perfect golden-brown color. A hot oven helps the cookies rise properly, giving them a delightful texture.
Step 2: Cream the Cheese and Butter
In a large mixing bowl, beat the softened cream cheese and butter together until smooth and creamy. This step is essential for achieving the right texture. Properly creamed ingredients create a light and fluffy base, which is key to the cheesecake flavor in these cookies.
Step 3: Mix in Sugar, Egg, and Vanilla
Add the granulated sugar, large egg, and vanilla extract to the creamed mixture. The sugar sweetens the cookies, while the egg binds everything together, adding moisture. The vanilla enhances the flavor, making each bite irresistible. Mix until everything is well combined.
Step 4: Combine Dry Ingredients
In a separate bowl, whisk together the all-purpose flour, baking powder, and salt. Whisking the dry ingredients separately helps to evenly distribute the baking powder and salt, ensuring that your cookies rise perfectly and have a balanced flavor.
Step 5: Mix Wet and Dry Ingredients
Gradually add the dry mixture to the wet ingredients, stirring gently until just combined. Be careful not to overmix, as this can lead to tough cookies. You want a soft dough that holds together but still has a bit of texture.
Step 6: Fold in Crushed Oreos
Now comes the fun part! Gently fold in the crushed Oreo cookies. This step adds that delightful crunch and chocolatey flavor. Be gentle to avoid breaking the Oreos into too fine a crumb; you want those delicious chunks in every bite!
Step 7: Shape and Bake
Drop spoonfuls of dough onto a baking sheet lined with parchment paper, spacing them about two inches apart. This allows room for spreading. Bake in the preheated oven for 10-12 minutes, or until the edges are lightly golden. Keep an eye on them to avoid overbaking!
Step 8: Cooling the Cookies
Once baked, allow the cookies to cool on the baking sheet for a few minutes before transferring them to a wire rack. Cooling is important as it helps the cookies set and enhances their texture. Enjoy the aroma while they cool; it’s heavenly!
Tips for Success
- Use room temperature cream cheese and butter for easier mixing.
- Don’t overmix the dough; stop as soon as the flour is incorporated.
- For even baking, rotate your baking sheet halfway through the baking time.
- Let the cookies cool completely for the best texture before storing.
- Experiment with different Oreo flavors for a fun twist!
Equipment Needed
- Mixing bowls: Use any size, but a large bowl is best for mixing.
- Electric mixer: A hand mixer works well, but a stand mixer is even easier.
- Baking sheet: A standard cookie sheet or any flat baking tray will do.
- Parchment paper: Optional, but it prevents sticking and makes cleanup easier.
- Wire rack: For cooling cookies; a plate can work in a pinch.
Variations
- Healthier Option: Substitute half of the all-purpose flour with whole wheat flour for added fiber.
- Vegetarian Delight: These cookies are already vegetarian-friendly, but you can use plant-based cream cheese and butter for a vegan version.
- Gluten-Free: Use a gluten-free all-purpose flour blend to make these cookies gluten-free without sacrificing taste.
- Spicy Twist: Add a pinch of cinnamon or a dash of espresso powder to the dough for a unique flavor profile.
- Extra Indulgent: Mix in chocolate chips or drizzle melted chocolate on top for a decadent finish.
Serving Suggestions
- Pair these cookies with a glass of cold milk for a classic treat.
- Serve alongside a scoop of vanilla ice cream for an indulgent dessert.
- Present them on a decorative platter for gatherings or parties.
- Drizzle with chocolate sauce for an extra touch of sweetness.
FAQs about Oreo Cheesecake Cookies
Can I make these Oreo Cheesecake Cookies ahead of time?
Absolutely! You can prepare the dough in advance and refrigerate it for up to 24 hours. Just scoop the dough onto the baking sheet when you’re ready to bake. This is a great time-saver for busy days!
How should I store leftover cookies?
Store your Oreo Cheesecake Cookies in an airtight container at room temperature for up to a week. If you want to keep them longer, consider freezing them for up to three months. Just make sure to separate layers with parchment paper to prevent sticking.
Can I use different types of Oreos?
Yes! Feel free to experiment with different Oreo flavors, like mint or peanut butter, to create unique variations of these cookies. Each type will add its own twist to the flavor profile!
Why are my cookies flat?
Flat cookies can result from using melted butter instead of softened butter or not chilling the dough before baking. Make sure to follow the instructions closely for the best results!
Can I freeze the cookie dough?
Yes, you can freeze the cookie dough! Just scoop the dough onto a baking sheet, freeze until solid, then transfer to a freezer bag. When you’re ready to bake, just add a couple of extra minutes to the baking time.
Summarizing the Joy of Oreo Cheesecake Cookies
There’s something truly magical about baking a batch of Oreo Cheesecake Cookies. The aroma wafting through your kitchen, the anticipation of that first bite, and the smiles on your loved ones’ faces make it all worthwhile. These cookies are not just a treat; they’re a way to create memories and share joy. Whether you’re enjoying them with a glass of milk after a long day or serving them at a family gathering, each cookie is a reminder of the simple pleasures in life. So, roll up your sleeves and indulge in this delightful recipe today!
PrintOreo Cheesecake Cookies: A Must-Try Delight Today!

Oreo Cheesecake Cookies are a delicious blend of creamy cheesecake and crunchy Oreo cookies, perfect for dessert lovers.
- Prep Time: 15 minutes
- Cook Time: 12 minutes
- Total Time: 27 minutes
- Yield: 24 cookies
- Category: Dessert
- Method: Baking
- Cuisine: American
- Diet: Vegetarian
Ingredients
- 1 cup cream cheese, softened
- 1/2 cup unsalted butter, softened
- 1 cup granulated sugar
- 1 large egg
- 1 teaspoon vanilla extract
- 1 1/2 cups all-purpose flour
- 1/2 teaspoon baking powder
- 1/4 teaspoon salt
- 1 cup crushed Oreo cookies
Instructions
- Preheat your oven to 350°F (175°C).
- In a large bowl, beat the cream cheese and butter until smooth.
- Add the sugar, egg, and vanilla extract, mixing until well combined.
- In another bowl, whisk together the flour, baking powder, and salt.
- Gradually add the dry ingredients to the wet mixture, stirring until just combined.
- Fold in the crushed Oreo cookies.
- Drop spoonfuls of dough onto a baking sheet lined with parchment paper.
- Bake for 10-12 minutes or until the edges are lightly golden.
- Allow to cool on the baking sheet for a few minutes before transferring to a wire rack to cool completely.
Notes
- For a richer flavor, use double-stuffed Oreos.
- Store cookies in an airtight container for up to a week.
- These cookies can be frozen for up to 3 months.