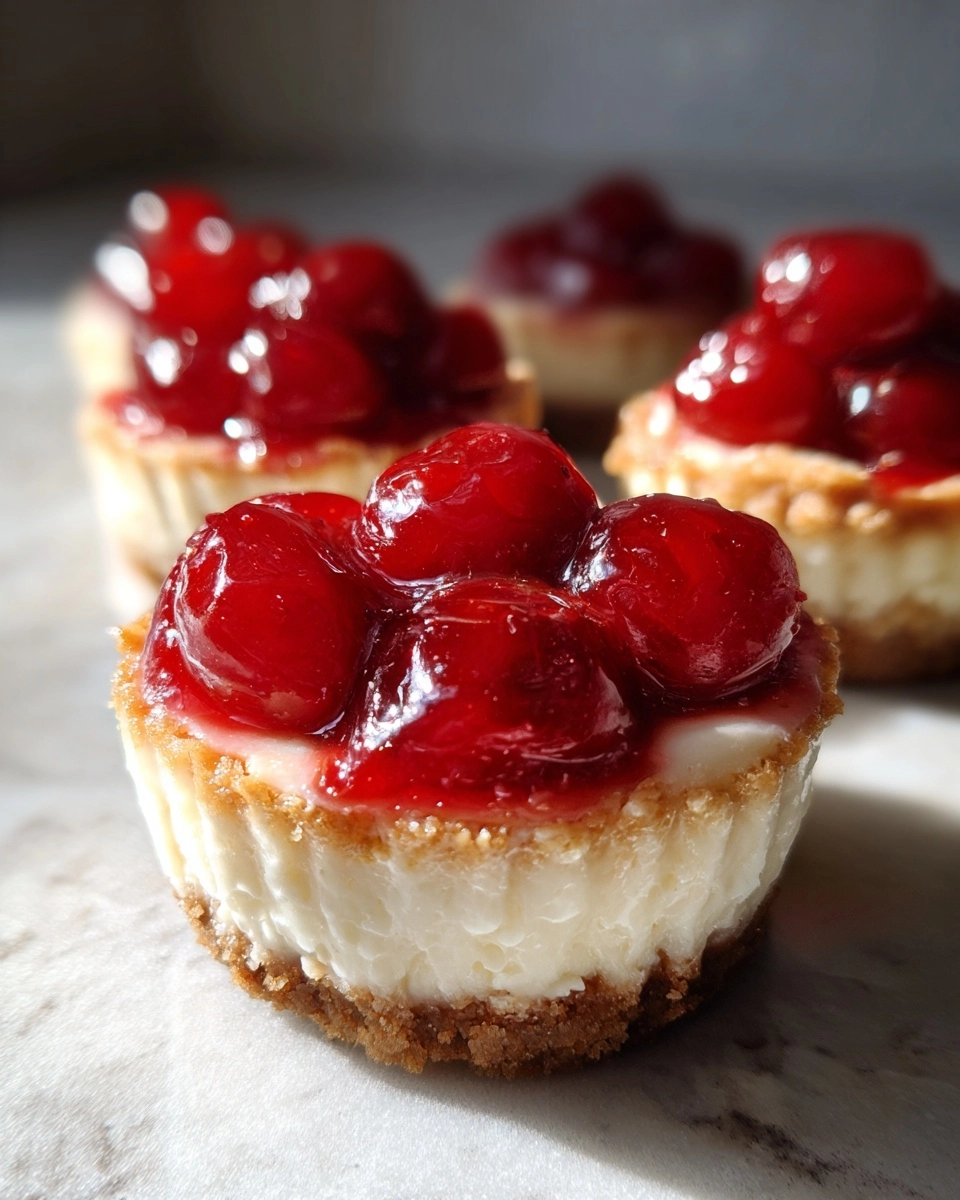
Mini Cherry Cream Cheese Pies — Tiny Desserts, Huge Flavor
As a busy mom, I know how precious time can be, especially when it comes to whipping up something sweet. That’s why I adore these Mini Cherry Cream Cheese Pies — tiny desserts that pack a huge flavor punch! They’re perfect for those moments when you want to impress your loved ones without spending hours in the kitchen. With just a handful of ingredients and a little love, you can create delightful bite-sized treats that will have everyone asking for seconds. Trust me, these little gems are a quick solution for satisfying your sweet tooth!
Why You’ll Love This Mini Cherry Cream Cheese Pies
These Mini Cherry Cream Cheese Pies are a dream come true for busy lives! They come together in just 35 minutes, making them a quick and easy dessert option. The creamy filling combined with the sweet cherry topping creates a flavor explosion that’s simply irresistible. Plus, they’re perfect for any occasion, whether it’s a family gathering or a cozy night in. You’ll love how effortlessly they impress!
Ingredients for Mini Cherry Cream Cheese Pies
Gathering the right ingredients is the first step to creating these delightful Mini Cherry Cream Cheese Pies. Here’s what you’ll need:
- Cream Cheese: This is the star of the show! It gives the filling its rich, creamy texture.
- Powdered Sugar: A touch of sweetness that balances the tanginess of the cream cheese.
- Vanilla Extract: Adds a warm, aromatic flavor that enhances the overall taste.
- Pre-made Pie Crust: A time-saver! It provides a flaky base for your mini pies. You can use store-bought or homemade if you’re feeling adventurous.
- Cherry Pie Filling: This sweet topping brings a burst of fruity flavor. Feel free to swap it out for other fruit fillings like blueberry or strawberry for a twist!
For those with dietary restrictions, consider using a gluten-free pie crust to make these treats accessible to everyone. If you want to get creative, you can also experiment with different flavored extracts or add a sprinkle of lemon zest to the cream cheese mixture for a refreshing zing.
Exact measurements for each ingredient can be found at the bottom of the article, ready for printing!
How to Make Mini Cherry Cream Cheese Pies
Now that you have your ingredients ready, let’s dive into the fun part: making these Mini Cherry Cream Cheese Pies! Follow these simple steps, and you’ll have a batch of delightful tiny desserts in no time.
Step 1: Preheat the Oven
First things first, preheat your oven to 350°F (175°C). Preheating is crucial because it ensures that your pies bake evenly. A hot oven helps the crust become golden and flaky, while the filling gets perfectly creamy. Trust me, you don’t want to skip this step!
Step 2: Prepare the Cream Cheese Filling
In a mixing bowl, beat the cream cheese until it’s smooth and creamy. I like to use an electric mixer for this, but a whisk works too if you’re feeling strong! Once it’s nice and fluffy, add in the powdered sugar and vanilla extract. Mix until everything is well combined. The result should be a luscious filling that’s just begging to be spooned into those crusts!
Step 3: Prepare the Pie Crust
Next, roll out your pre-made pie crust on a lightly floured surface. Aim for about 1/8 inch thick. Using a round cookie cutter or a glass, cut out small circles that will fit into your mini muffin tin. Don’t worry if they’re not perfect; a little rustic charm adds character!
Step 4: Assemble the Pies
Now it’s time to assemble! Gently press each pie crust circle into the muffin tin, making sure to cover the bottom and sides. Then, fill each crust with the creamy mixture you prepared earlier. Don’t overfill; leave a little space for the pies to puff up while baking!
Step 5: Bake the Pies
Pop the muffin tin into your preheated oven and bake for 15-20 minutes. Keep an eye on them! You’ll know they’re done when the crust is golden brown. A little tip: if you gently shake the tin, the filling should be set but still slightly jiggly. That’s the sweet spot!
Step 6: Add the Cherry Topping
Once your pies are out of the oven, let them cool for a few minutes. This is the hardest part, I know! After they’ve cooled slightly, top each mini pie with a generous spoonful of cherry pie filling. The vibrant red cherries add a pop of color and flavor that’s simply irresistible!
Tips for Success
- Make sure your cream cheese is at room temperature for easy mixing.
- Don’t skip the preheating step; it’s key for a perfect crust.
- Use a mini muffin tin for uniformity and easy serving.
- Experiment with different fruit toppings for variety.
- Let the pies cool completely before adding the cherry filling for the best texture.
Equipment Needed
- Mini muffin tin: Essential for shaping your pies. A regular muffin tin works too, just adjust the baking time.
- Mixing bowl: Any size will do, but a medium bowl is perfect for mixing the filling.
- Electric mixer or whisk: For beating the cream cheese until smooth.
- Rolling pin: Helps roll out the pie crust evenly.
- Cookie cutter or glass: To cut out the pie crust circles.
Variations
- For a chocolate twist, add cocoa powder to the cream cheese filling for a rich flavor.
- Try using different fruit fillings like blueberry, raspberry, or peach for a seasonal touch.
- For a nutty flavor, mix in some finely chopped nuts or a sprinkle of almond extract.
- Make them mini cheesecakes by adding a layer of graham cracker crumbs at the bottom of each crust.
- For a dairy-free option, substitute cream cheese with a plant-based alternative and use coconut cream for a tropical flair.
Serving Suggestions
- Pair these Mini Cherry Cream Cheese Pies with a scoop of vanilla ice cream for a delightful contrast.
- Serve alongside a cup of freshly brewed coffee or tea for a cozy afternoon treat.
- For a festive touch, garnish with mint leaves or a dusting of powdered sugar.
- Present them on a colorful platter for a beautiful dessert display at gatherings.
FAQs about Mini Cherry Cream Cheese Pies
As you embark on your journey to create these delightful Mini Cherry Cream Cheese Pies, you might have a few questions. Here are some common queries I’ve encountered, along with helpful answers to guide you along the way!
Can I make these Mini Cherry Cream Cheese Pies ahead of time?
Absolutely! These tiny desserts can be made a day in advance. Just store them in the refrigerator without the cherry topping. Add the cherry filling right before serving for the freshest taste.
What can I use instead of cherry pie filling?
If cherries aren’t your thing, feel free to swap in other fruit fillings! Blueberry, strawberry, or even a mix of berries can create a delicious twist on this classic recipe.
How do I store leftover Mini Cherry Cream Cheese Pies?
Store any leftovers in an airtight container in the refrigerator. They should stay fresh for about 3-4 days, but I doubt they’ll last that long!
Can I freeze these pies?
Yes, you can freeze them! Just make sure to freeze them before adding the cherry topping. Wrap them tightly in plastic wrap and store in a freezer-safe container. They’ll be good for up to a month!
What’s the best way to serve these pies?
These Mini Cherry Cream Cheese Pies shine when served chilled. You can also add a dollop of whipped cream or a scoop of ice cream for an extra indulgent treat!
Summarizing the Joy of Mini Cherry Cream Cheese Pies
There’s something truly magical about these Mini Cherry Cream Cheese Pies. They’re not just desserts; they’re little bites of happiness that bring smiles to faces. Each creamy, cherry-topped morsel is a reminder that even the busiest days can be sweet. Whether you’re celebrating a special occasion or simply treating yourself, these tiny desserts deliver huge flavor and joy. Plus, they’re a fantastic way to bond with family and friends in the kitchen. So, roll up your sleeves, gather your loved ones, and create delicious memories with these delightful pies!
PrintMini Cherry Cream Cheese Pies: Indulge in Tiny Desserts!
Mini Cherry Cream Cheese Pies are delightful bite-sized desserts that combine a creamy filling with a sweet cherry topping, perfect for satisfying your sweet tooth.
- Prep Time: 15 minutes
- Cook Time: 20 minutes
- Total Time: 35 minutes
- Yield: 24 mini pies
- Category: Dessert
- Method: Baking
- Cuisine: American
- Diet: Vegetarian
Ingredients
- 1 package of cream cheese (8 oz)
- 1/2 cup powdered sugar
- 1 teaspoon vanilla extract
- 1 pre-made pie crust
- 1 can cherry pie filling (21 oz)
Instructions
- Preheat the oven to 350°F (175°C).
- In a mixing bowl, beat the cream cheese until smooth.
- Add powdered sugar and vanilla extract, mixing until well combined.
- Roll out the pie crust and cut into small circles to fit into a mini muffin tin.
- Press the pie crust circles into the muffin tin.
- Fill each crust with the cream cheese mixture.
- Bake for 15-20 minutes or until the crust is golden.
- Let cool and top each pie with cherry pie filling.
Notes
- For a gluten-free option, use a gluten-free pie crust.
- These pies can be made a day in advance and stored in the refrigerator.
- Feel free to substitute cherry filling with other fruit fillings like blueberry or strawberry.