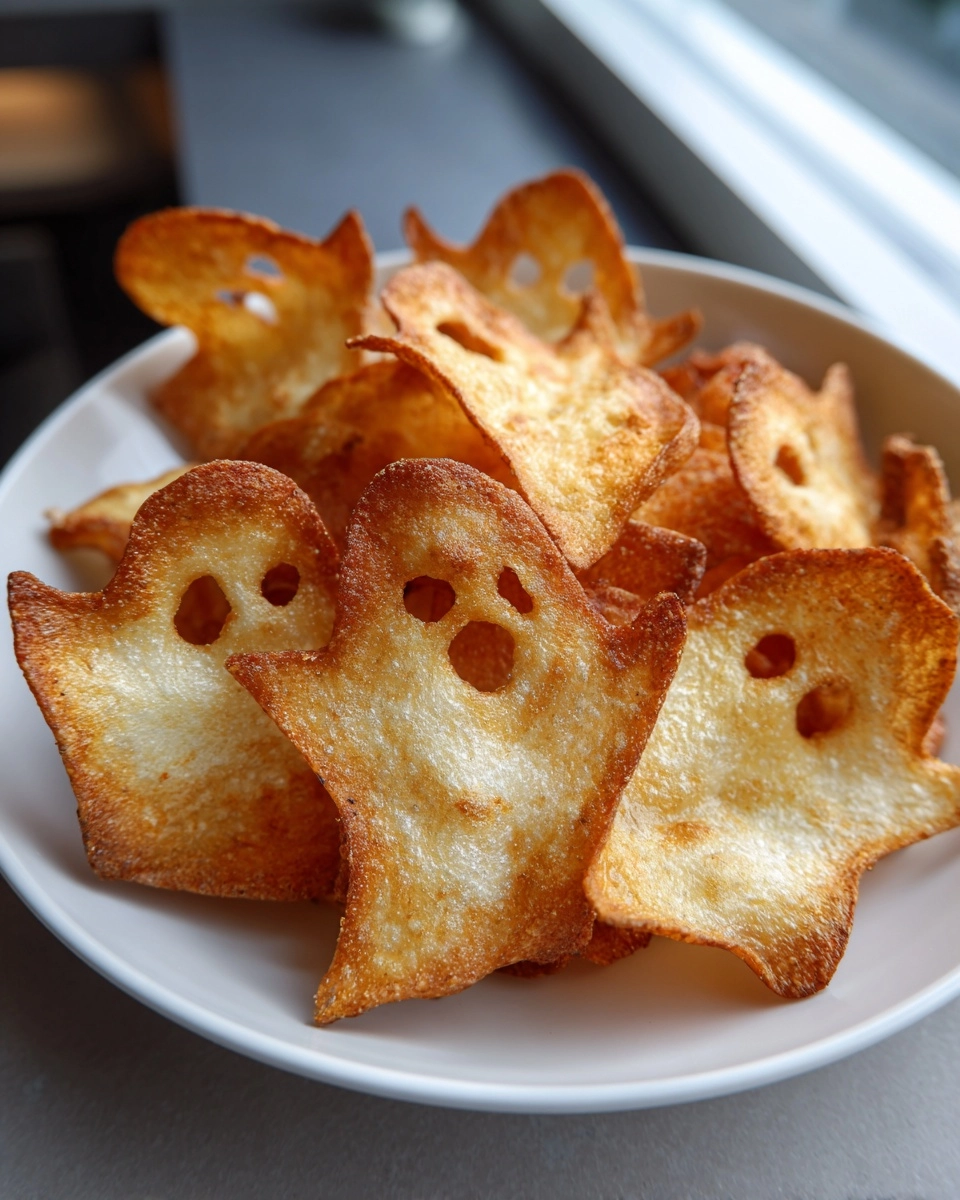
Spooky Baked Ghost Chips a Crunchy Halloween Delight
As the leaves turn and the air gets crisp, I find myself dreaming up fun treats for Halloween. One of my favorites is the Spooky Baked Ghost Chips, a crunchy Halloween delight that’s perfect for parties or a cozy night in with the family. These ghost-shaped snacks are not only adorable but also super easy to whip up, making them a fantastic solution for busy moms like us. With just a handful of ingredients, you can create a dish that will impress your loved ones and keep the Halloween spirit alive!
Why You’ll Love This Spooky Baked Ghost Chips a Crunchy Halloween Delight
These Spooky Baked Ghost Chips are a game-changer for busy days. They come together in just 40 minutes, making them a quick and delightful snack. The crispy texture and savory flavors will have everyone reaching for more. Plus, they’re a healthier alternative to traditional chips, so you can indulge without the guilt. Trust me, your family will love these ghostly treats!
Ingredients for Spooky Baked Ghost Chips a Crunchy Halloween Delight
To create these delightful Spooky Baked Ghost Chips, you’ll need a few simple ingredients that you might already have in your kitchen. Here’s what you’ll need:
- Potatoes: The star of the show! Choose large potatoes for the best ghost shapes. Russets work wonderfully due to their starchy texture.
- Olive oil: This adds a lovely richness and helps the chips crisp up beautifully in the oven.
- Garlic powder: A sprinkle of this brings a savory depth to your ghostly snacks, making them irresistible.
- Onion powder: Just like garlic, this adds a hint of sweetness and flavor that complements the potatoes perfectly.
- Salt: Essential for enhancing all the flavors. Adjust to your taste preference.
- Black pepper: A dash of this adds a subtle kick, balancing the flavors beautifully.
For those looking to spice things up, consider adding paprika for a smoky flavor or cayenne pepper for a bit of heat. If you’re out of olive oil, feel free to substitute with canola or avocado oil. You can find the exact measurements for these ingredients at the bottom of the article, ready for printing!
How to Make Spooky Baked Ghost Chips a Crunchy Halloween Delight
Step 1: Preheat the Oven
First things first, preheat your oven to 400°F (200°C). This step is crucial for achieving that perfect crunch. A hot oven ensures the ghost chips bake evenly and become golden brown. Trust me, you don’t want to skip this part!
Step 2: Prepare the Potatoes
Next, wash and peel the potatoes. I like to use a vegetable peeler for this task. Once peeled, slice the potatoes into thin rounds. Aim for about 1/8 inch thick. This thickness helps them crisp up nicely while baking.
Step 3: Cut Out Ghost Shapes
Now comes the fun part! Use a ghost-shaped cookie cutter to cut out ghost shapes from the potato slices. If you don’t have a ghost cutter, any fun shape will do. Just make sure they’re not too small, or they might burn!
Step 4: Season the Ghost Chips
In a large bowl, toss the ghost-shaped potato slices with olive oil, garlic powder, onion powder, salt, and black pepper. Make sure every chip is coated evenly. This seasoning is what makes these spooky snacks so delicious!
Step 5: Arrange on Baking Sheet
Line a baking sheet with parchment paper and arrange the ghost chips in a single layer. Leave some space between each chip. This spacing is key for even cooking and helps them get that delightful crunch.
Step 6: Bake to Perfection
Pop the baking sheet into the oven and bake for 20-25 minutes. Flip the chips halfway through to ensure they cook evenly. Keep an eye on them; you want them golden and crispy, not burnt!
Step 7: Cool and Serve
Once baked, let the ghost chips cool for a few minutes. This cooling time helps them crisp up even more. Serve them with a spooky dip like guacamole or salsa for an extra treat!
Tips for Success
- Use a mandoline slicer for even potato slices, ensuring consistent cooking.
- Experiment with different seasonings like ranch or taco seasoning for unique flavors.
- Don’t overcrowd the baking sheet; this helps achieve maximum crispiness.
- For extra crunch, try broiling the chips for the last few minutes of baking.
- Serve immediately for the best texture; they’re best enjoyed fresh!
Equipment Needed
- Baking sheet: A standard baking sheet works well. If you have a cooling rack, place it on top for extra crispiness.
- Parchment paper: This prevents sticking. If you’re out, a silicone baking mat is a great alternative.
- Cookie cutter: A ghost-shaped cutter is ideal, but any fun shape will do!
- Vegetable peeler: Essential for peeling potatoes. A sharp knife can work in a pinch.
Variations
- Sweet Potato Ghost Chips: Swap regular potatoes for sweet potatoes for a sweeter, nutrient-packed alternative.
- Herbed Ghost Chips: Add dried herbs like rosemary or thyme to the seasoning mix for an aromatic twist.
- Cheesy Ghost Chips: Sprinkle nutritional yeast or grated cheese on top before baking for a cheesy flavor.
- Spicy Ghost Chips: Mix in some cayenne pepper or chili powder for a fiery kick that will thrill spice lovers.
- Gluten-Free Option: This recipe is naturally gluten-free, making it perfect for those with dietary restrictions.
Serving Suggestions
- Pair your Spooky Baked Ghost Chips with a vibrant guacamole for a creamy contrast.
- Serve alongside a zesty salsa to add a refreshing kick.
- For drinks, consider a spooky punch or apple cider to keep the Halloween theme alive.
- Present the chips in a fun Halloween-themed bowl for added flair!
FAQs about Spooky Baked Ghost Chips a Crunchy Halloween Delight
Can I make Spooky Baked Ghost Chips ahead of time?
Absolutely! You can prepare the ghost chips and season them in advance. Just store them in the fridge until you’re ready to bake. This makes it super convenient for busy days!
What can I serve with these ghost chips?
These spooky snacks pair wonderfully with dips like guacamole, salsa, or even a creamy ranch dressing. They add a fun twist to your Halloween spread!
How do I store leftover ghost chips?
Store any leftover Spooky Baked Ghost Chips in an airtight container for up to two days. However, they’re best enjoyed fresh for that perfect crunch!
Can I use other vegetables for ghost shapes?
Definitely! You can use carrots, zucchini, or even beets to create fun shapes. Just adjust the baking time as needed for different vegetables.
Are these ghost chips suitable for kids?
Yes! These Spooky Baked Ghost Chips are a kid-friendly snack. They’re not only fun to eat but also healthier than traditional chips, making them a great choice for little ones!
Summarizing the Joy of Spooky Baked Ghost Chips a Crunchy Halloween Delight
Creating these Spooky Baked Ghost Chips is more than just cooking; it’s about making memories with your loved ones. The laughter shared while cutting out ghost shapes and the excitement of tasting these crunchy delights brings everyone together. They’re a fun, healthier alternative to traditional snacks, perfect for Halloween gatherings or cozy family nights. Plus, the joy of seeing your kids enjoy a homemade treat is priceless. So, roll up your sleeves, embrace the Halloween spirit, and let these ghostly chips add a sprinkle of magic to your celebrations!
PrintSpooky Baked Ghost Chips for a Crunchy Halloween Treat!

A fun and crunchy Halloween snack shaped like ghosts, perfect for parties and trick-or-treaters.
- Prep Time: 15 minutes
- Cook Time: 25 minutes
- Total Time: 40 minutes
- Yield: 4 servings
- Category: Snack
- Method: Baking
- Cuisine: American
- Diet: Vegetarian
Ingredients
- 2 large potatoes
- 1 tablespoon olive oil
- 1 teaspoon garlic powder
- 1 teaspoon onion powder
- Salt to taste
- Black pepper to taste
Instructions
- Preheat the oven to 400°F (200°C).
- Wash and peel the potatoes, then slice them into thin rounds.
- Use a ghost-shaped cookie cutter to cut out ghost shapes from the potato slices.
- In a bowl, toss the ghost-shaped potato slices with olive oil, garlic powder, onion powder, salt, and pepper.
- Arrange the ghost chips on a baking sheet lined with parchment paper.
- Bake for 20-25 minutes or until golden and crispy, flipping halfway through.
- Let cool slightly before serving.
Notes
- For extra flavor, consider adding paprika or cayenne pepper.
- Serve with a spooky dip like guacamole or salsa.
- Store any leftovers in an airtight container for up to 2 days.