Rustic Italian Crusty Bread Recipe (2 Hr) – Bakery-Style Loaf
There’s something magical about the aroma of freshly baked bread wafting through the house. This Rustic Italian Crusty Bread Recipe (2 Hr) is my go-to for those busy days when I want to impress my family without spending hours in the kitchen. With just a few simple ingredients and a little love, you can create a bakery-style loaf that’s perfect for any meal. Whether it’s a cozy dinner or a casual brunch, this bread will steal the show. Trust me, your loved ones will be begging for seconds!
Why You’ll Love This Rustic Italian Crusty Bread Recipe (2 Hr)
This Rustic Italian Crusty Bread Recipe (2 Hr) is a lifesaver for busy moms and professionals like us. It’s incredibly easy to whip up, taking just two hours from start to finish. The taste? Oh, it’s like a warm hug from your favorite bakery! With a crispy crust and soft, airy interior, this bread elevates any meal. Plus, it’s a fantastic way to bond with your family while creating something delicious together.
Ingredients for Rustic Italian Crusty Bread Recipe (2 Hr)
Gathering the right ingredients is the first step to baking success. For this Rustic Italian Crusty Bread Recipe (2 Hr), you’ll need a few pantry staples that work together to create that delightful loaf.
- All-purpose flour: This is the backbone of your bread. It gives structure and a lovely chew. You can substitute with bread flour for a chewier texture.
- Warm water: This activates the yeast. Make sure it’s not too hot; you want it cozy, like a warm bath for your yeast.
- Salt: Essential for flavor, salt also strengthens the dough. It’s like the secret handshake that brings all the ingredients together.
- Sugar: Just a teaspoon helps to feed the yeast, giving it a little boost. It’s like a tiny energy drink for your dough!
- Active dry yeast: This is what makes your bread rise. Look for a packet that’s fresh for the best results.
Feel free to get creative! You can add herbs like rosemary or garlic for an extra flavor kick. If you’re feeling adventurous, try incorporating some whole wheat flour for a nuttier taste. For exact measurements, check the bottom of the article where you can find everything ready for printing.
How to Make Rustic Italian Crusty Bread Recipe (2 Hr)
Step 1: Prepare the Yeast Mixture
Start by grabbing a medium bowl. Pour in the warm water, then sprinkle the sugar over it. This little bit of sweetness is like a warm hug for the yeast! Next, add the active dry yeast. Give it a gentle stir, then let it sit for about 5 minutes. You’ll know it’s ready when it becomes frothy and bubbly, like a mini volcano. This step is crucial; it wakes up the yeast and gets it excited to help your bread rise!
Step 2: Mix the Dough
Once your yeast mixture is frothy, it’s time to bring in the flour and salt. In a large mixing bowl, combine the all-purpose flour and salt. Make a little well in the center and pour in the yeast mixture. Using a wooden spoon or your hands, mix everything together until a shaggy dough forms. Don’t worry if it looks a bit messy; that’s part of the charm! This dough is the foundation of your Rustic Italian Crusty Bread Recipe (2 Hr).
Step 3: Knead the Dough
Now comes the fun part—kneading! Lightly flour your countertop and turn the dough out onto it. With clean hands, knead the dough for about 10 minutes. You want to push, fold, and turn it until it’s smooth and elastic. Think of it as giving your dough a little workout! If it’s too sticky, sprinkle a bit more flour. This step is essential for developing that lovely texture we all crave in a crusty loaf.
Step 4: First Rise
After kneading, it’s time for the dough to rise. Lightly grease a large bowl with oil and place your dough inside. Cover it with a clean kitchen towel or plastic wrap. Now, let it sit in a warm spot for about 1 hour. You’ll know it’s ready when it has doubled in size. This is where the magic happens, as the yeast works its wonders, creating air pockets that will make your bread light and fluffy.
Step 5: Shape the Loaf
Once your dough has risen, it’s time to shape it. Gently punch down the dough to release the air. Turn it out onto a floured surface and shape it into a loaf. You can make it round or oval, depending on your preference. Just tuck the edges underneath to create a smooth top. This shaping step is like giving your bread a little personality, preparing it for its big moment in the oven!
Step 6: Second Rise
Now that your loaf is shaped, it’s time for a second rise. Place the loaf on a baking sheet lined with parchment paper. Cover it again with a towel and let it rise for another 30 minutes. This final rise is crucial for achieving that perfect texture. While you wait, you can daydream about how amazing your kitchen will smell once it’s baking!
Step 7: Preheat the Oven
As your loaf rises, it’s the perfect time to preheat your oven. Set it to 450°F (230°C). This high temperature is key to getting that beautiful crust we all love. If you want an even crustier loaf, place a pan of water on the bottom rack of the oven. This will create steam, helping your bread rise even more while baking. Get ready for the deliciousness that’s about to unfold!
Step 8: Bake the Bread
Once your oven is hot and your loaf has risen, it’s time to bake! Carefully score the top of the loaf with a sharp knife. This allows the bread to expand while baking. Place the loaf in the oven and bake for 25-30 minutes. You’ll know it’s done when it’s golden brown and sounds hollow when tapped on the bottom. The aroma will fill your home, making it hard to resist sneaking a piece!
Step 9: Cool and Slice
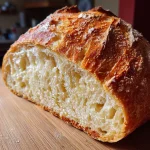
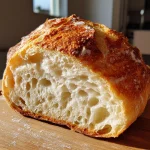
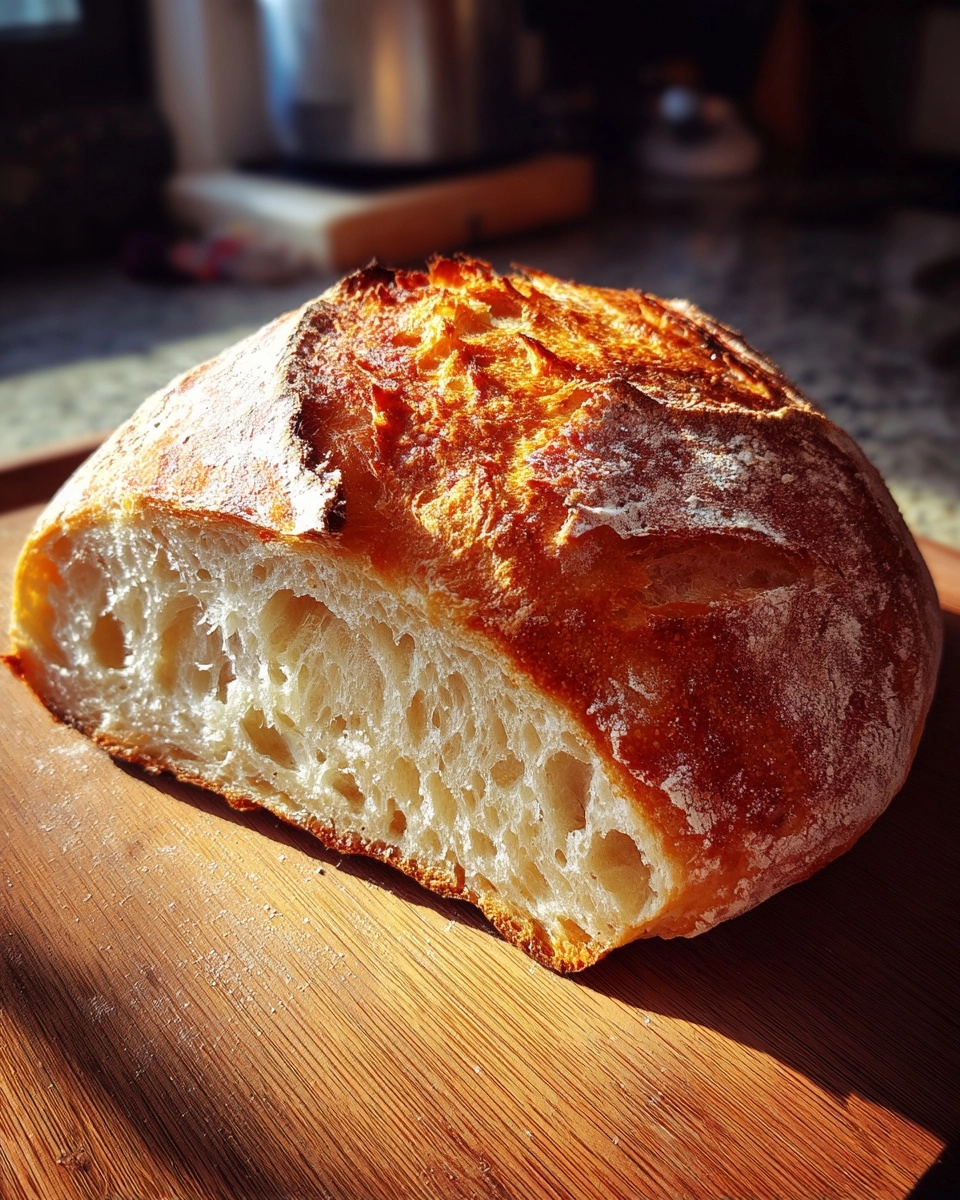
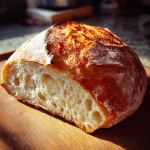
After baking, remove the bread from the oven and let it cool on a wire rack. This cooling step is important; it allows the steam to escape, ensuring a crusty exterior. Once it’s cool enough to handle, slice into that beautiful loaf. The first slice is always the best, revealing the soft, airy interior. Enjoy your homemade Rustic Italian Crusty Bread Recipe (2 Hr) with butter, olive oil, or your favorite spread!
Tips for Success
- Use fresh yeast for the best rise; check the expiration date.
- Don’t rush the rising times; patience is key for fluffy bread.
- Keep your workspace floured to prevent sticking while kneading.
- Experiment with different herbs or spices for unique flavors.
- For a softer crust, brush the loaf with melted butter after baking.
Equipment Needed
- Mixing bowl: A large bowl for mixing dough. A sturdy pot can work in a pinch.
- Wooden spoon: Perfect for mixing. You can also use your hands for a more personal touch!
- Baking sheet: A flat surface for baking. A pizza stone is a great alternative for a crustier loaf.
- Kitchen towel: To cover the dough while it rises. Plastic wrap is a good substitute.
- Wire rack: For cooling the bread. A plate can do the job if you don’t have one.
Variations of Rustic Italian Crusty Bread Recipe (2 Hr)
- Herb-Infused: Add dried herbs like rosemary, thyme, or oregano to the dough for a fragrant twist.
- Garlic Bread: Mix in minced garlic or garlic powder for a deliciously savory flavor.
- Cheesy Delight: Fold in shredded cheese like Parmesan or mozzarella for a cheesy crust.
- Whole Wheat Option: Substitute half of the all-purpose flour with whole wheat flour for a nuttier taste and added fiber.
- Olive Oil Bread: Replace some of the water with olive oil for a richer flavor and softer texture.
- Seed Topping: Before baking, sprinkle sesame or poppy seeds on top for added crunch and visual appeal.
Serving Suggestions for Rustic Italian Crusty Bread Recipe (2 Hr)
- Serve warm with a drizzle of olive oil and balsamic vinegar for dipping.
- Pair with a hearty soup, like minestrone or tomato basil, for a comforting meal.
- Use slices for bruschetta topped with fresh tomatoes and basil.
- Enjoy alongside a cheese platter for a delightful appetizer.
- Present the loaf on a rustic wooden board for a charming touch.
FAQs about Rustic Italian Crusty Bread Recipe (2 Hr)
Can I use whole wheat flour instead of all-purpose flour?
Absolutely! You can substitute half of the all-purpose flour with whole wheat flour for a nuttier flavor and added fiber. Just keep in mind that it may change the texture slightly, making it denser.
What if my dough doesn’t rise?
If your dough doesn’t rise, it could be due to inactive yeast. Always check the expiration date on your yeast packet. Also, ensure your water is warm, not hot, as too much heat can kill the yeast.
How do I store leftover bread?
To keep your bread crusty, store it in a paper bag at room temperature. Avoid plastic bags, as they can make the crust soggy. If you have a lot left, consider freezing slices for later enjoyment!
Can I add other flavors to this Rustic Italian Crusty Bread Recipe (2 Hr)?
Definitely! Feel free to experiment with herbs, spices, or even cheese. Adding minced garlic or dried herbs can elevate the flavor profile, making it even more delightful!
How can I tell when the bread is done baking?
Your bread is done when it’s golden brown and sounds hollow when tapped on the bottom. If you have a kitchen thermometer, the internal temperature should be around 190°F (88°C) for a perfectly baked loaf.
Summarizing the Joy of Baking Rustic Italian Crusty Bread Recipe (2 Hr)
Baking this Rustic Italian Crusty Bread Recipe (2 Hr) is more than just a culinary task; it’s a delightful experience that fills your home with warmth and love. The joy of watching the dough rise, the anticipation of that golden crust, and the aroma that envelops your kitchen are simply unmatched. Each slice tells a story of family gatherings and cozy dinners. Plus, sharing this homemade bread with loved ones creates lasting memories. So, roll up your sleeves, embrace the process, and let the magic of baking bring happiness to your table!
PrintRustic Italian Crusty Bread Recipe (2 Hr) for Perfect Loaf
A simple and quick recipe for making rustic Italian crusty bread that results in a bakery-style loaf in just 2 hours.
- Prep Time: 15 minutes
- Cook Time: 30 minutes
- Total Time: 2 hours
- Yield: 1 loaf
- Category: Bread
- Method: Baking
- Cuisine: Italian
- Diet: Vegetarian
Ingredients
- 4 cups all-purpose flour
- 1 1/2 cups warm water
- 2 teaspoons salt
- 1 teaspoon sugar
- 1 packet (2 1/4 teaspoons) active dry yeast
Instructions
- In a bowl, combine warm water, sugar, and yeast. Let it sit for 5 minutes until frothy.
- Add flour and salt to the yeast mixture and mix until a dough forms.
- Knead the dough on a floured surface for about 10 minutes until smooth.
- Place the dough in a greased bowl, cover, and let it rise for 1 hour or until doubled in size.
- Punch down the dough and shape it into a loaf.
- Place the loaf on a baking sheet and let it rise for another 30 minutes.
- Preheat the oven to 450°F (230°C).
- Score the top of the loaf with a sharp knife and bake for 25-30 minutes until golden brown.
- Let the bread cool on a wire rack before slicing.
Notes
- For a crustier loaf, place a pan of water in the oven while baking.
- Experiment with adding herbs or garlic for extra flavor.
- Store leftover bread in a paper bag to maintain crustiness.