Maple Pumpkin Cookies
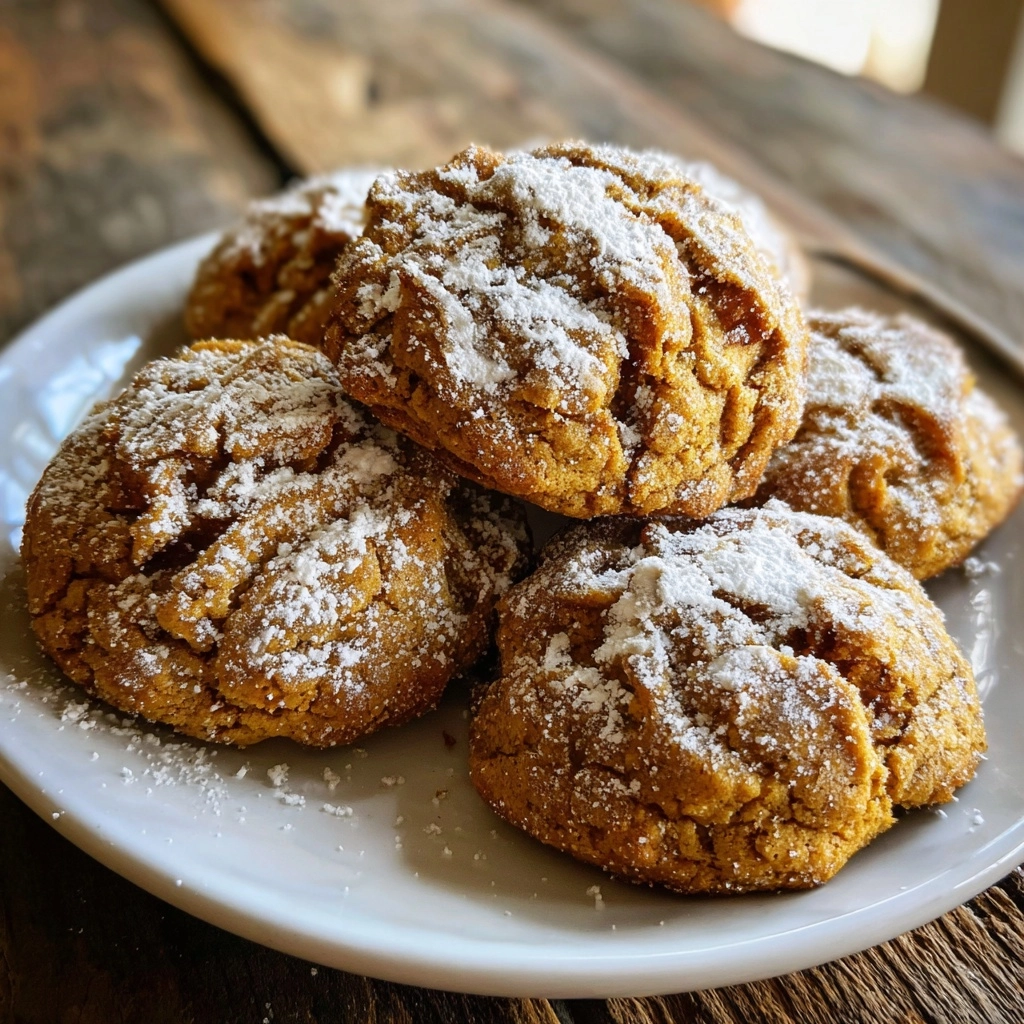
As the leaves turn and the air gets crisp, there’s nothing quite like the aroma of freshly baked Maple Pumpkin Cookies wafting through the house. These delightful treats are not just a quick solution for a busy day; they’re a warm hug in cookie form!
I love how they blend the rich flavors of maple and pumpkin, making them perfect for cozy gatherings or a sweet pick-me-up after a long day. Whether you’re baking for your family or surprising a friend, these cookies are sure to impress and bring smiles all around.
Why You’ll Love This Maple Pumpkin Cookies
These Maple Pumpkin Cookies are a dream come true for busy moms and professionals alike. They come together in just 30 minutes, making them a perfect last-minute treat. The soft, chewy texture paired with the warm flavors of maple and pumpkin creates a delightful experience in every bite. Plus, they’re versatile enough to please even the pickiest eaters in your family. Trust me, once you try them, you’ll be hooked!
Ingredients for Maple Pumpkin Cookies
Gathering the right ingredients is the first step to creating these delightful Maple Pumpkin Cookies. Here’s what you’ll need:
- Pumpkin puree: This is the star of the show! It adds moisture and a subtle sweetness.
- Maple syrup: A natural sweetener that brings a rich, caramel-like flavor to the cookies.
- Brown sugar: It adds depth and a hint of molasses, enhancing the overall taste.
- Butter: Softened butter gives the cookies a tender texture and rich flavor.
- Egg: This binds the ingredients together and helps the cookies rise.
- All-purpose flour: The base of the cookies, providing structure and chewiness.
- Baking soda: A leavening agent that helps the cookies rise and become fluffy.
- Baking powder: Works alongside baking soda for a perfect lift.
- Cinnamon: This warm spice adds a cozy flavor, making them feel like fall.
- Nutmeg: A pinch of nutmeg enhances the autumnal taste, giving a warm, nutty aroma.
- Salt: Just a touch to balance the sweetness and enhance flavors.
- Chopped walnuts (optional): For those who enjoy a bit of crunch, walnuts add texture and a nutty flavor.
For exact measurements, check the bottom of the article where you can find everything listed for easy printing. Happy baking!
How to Make Maple Pumpkin Cookies
Making Maple Pumpkin Cookies is a delightful journey that fills your kitchen with warmth and sweet aromas. Follow these simple steps, and you’ll have a batch of cookies that are sure to impress. Let’s dive into the process!
Step 1: Preheat the Oven
First things first, preheat your oven to 350°F (175°C). Preheating is crucial because it ensures even baking. If the oven isn’t hot enough, your cookies may spread too much or not rise properly. Trust me, a well-preheated oven is the secret to perfect cookies!
Step 2: Cream the Butter and Sugars
In a large bowl, cream together the softened butter, brown sugar, and maple syrup until the mixture is smooth and fluffy. This step is vital for incorporating air into the dough, which helps the cookies rise. Use a hand mixer or stand mixer for the best results. Aim for a light, creamy texture that feels like a soft cloud!
Step 3: Mix in Pumpkin and Egg
Next, add the pumpkin puree and egg to the creamed mixture. Mix until everything is well combined. The pumpkin adds moisture and flavor, while the egg helps bind the ingredients together. You want a smooth, homogenous mixture that looks inviting and delicious!
Step 4: Combine Dry Ingredients
In a separate bowl, whisk together the all-purpose flour, baking soda, baking powder, cinnamon, nutmeg, and salt. This step is essential to evenly distribute the leavening agents and spices. It ensures that every bite of your Maple Pumpkin Cookies is perfectly flavored and fluffy!
Step 5: Mix Wet and Dry Ingredients
Gradually add the dry ingredients to the wet mixture, stirring gently until just combined. Be careful not to overmix, as this can lead to tough cookies. You want to see a few flour streaks remaining; it’s okay! This will keep your cookies soft and chewy, just the way we love them.
Step 6: Fold in Walnuts
If you’re using walnuts, gently fold them into the dough now. This adds a delightful crunch and nutty flavor to your cookies. Use a spatula to carefully incorporate the walnuts without overworking the dough. It’s all about balance and texture!
Step 7: Drop Dough onto Baking Sheet
Using a spoon or cookie scoop, drop spoonfuls of dough onto a baking sheet lined with parchment paper. Make sure to leave enough space between each cookie, as they will spread while baking. This little tip will help you avoid a cookie monster mash-up!
Step 8: Bake the Cookies
Bake your cookies in the preheated oven for 12-15 minutes. Keep an eye on them! They’re done when the edges are lightly golden. The centers may look a bit soft, but they will firm up as they cool. Trust your instincts; you want them to be perfectly baked!
Step 9: Cool and Enjoy
Once baked, allow the cookies to cool on the baking sheet for a few minutes before transferring them to a wire rack. This helps them set and makes them easier to handle. Store any leftovers in an airtight container for up to a week, but I doubt they’ll last that long!
Tips for Success
- Use room temperature ingredients for better mixing.
- Don’t skip the parchment paper; it prevents sticking and makes cleanup a breeze.
- For extra flavor, try adding a splash of vanilla extract.
- Keep an eye on baking time; ovens can vary.
- Let the cookies cool completely before storing to maintain their softness.
Equipment Needed
- Mixing bowls: A large bowl for wet ingredients and a medium bowl for dry ingredients.
- Hand mixer or stand mixer: For creaming the butter and sugars; a whisk works too!
- Baking sheet: A sturdy one lined with parchment paper for easy cleanup.
- Cookie scoop or spoon: For portioning the dough evenly.
- Wire rack: To cool the cookies after baking; a plate can work in a pinch.
Variations
- Gluten-Free: Substitute all-purpose flour with a gluten-free blend for a delicious gluten-free option.
- Dairy-Free: Use coconut oil or a dairy-free butter alternative to make these cookies dairy-free.
- Spiced Up: Add a pinch of ginger or cloves for an extra kick of fall flavor.
- Chocolate Chip: Fold in some chocolate chips for a sweet twist that chocolate lovers will adore.
- Oatmeal Pumpkin Cookies: Mix in rolled oats for added texture and heartiness.
Serving Suggestions
- Pair your Maple Pumpkin Cookies with a warm cup of spiced chai or apple cider for a cozy treat.
- Serve them alongside a scoop of vanilla ice cream for a delightful dessert experience.
- For a festive touch, dust with powdered sugar or drizzle with extra maple syrup before serving.
FAQs about Maple Pumpkin Cookies
As you embark on your baking adventure with Maple Pumpkin Cookies, you might have a few questions. Here are some common queries that can help you along the way:
Can I use fresh pumpkin instead of canned?
Absolutely! If you have fresh pumpkin, just cook and puree it until smooth. It adds a lovely, fresh flavor to your cookies.
How do I store leftover cookies?
Store your Maple Pumpkin Cookies in an airtight container at room temperature for up to a week. They’ll stay soft and delicious!
Can I freeze these cookies?
Yes! These cookies freeze beautifully. Just place them in a freezer-safe container, and they’ll last for up to three months. Thaw them at room temperature when you’re ready to enjoy.
What can I substitute for walnuts?
If you’re not a fan of walnuts, feel free to leave them out or replace them with pecans or even chocolate chips for a sweet twist!
Are these cookies suitable for a vegan diet?
To make these Maple Pumpkin Cookies vegan, substitute the egg with a flax egg or applesauce, and use a dairy-free butter alternative. They’ll still be delicious!
Summarizing the Joy of Maple Pumpkin Cookies
Baking Maple Pumpkin Cookies is more than just a recipe; it’s an experience that fills your home with warmth and joy. The delightful aroma wafting through the air brings back memories of cozy fall days and family gatherings. Each bite is a perfect blend of soft, chewy goodness, with the rich flavors of maple and pumpkin dancing on your taste buds.
Whether you’re sharing them with loved ones or enjoying a quiet moment with a cup of tea, these cookies create connections and smiles. So, roll up your sleeves and let the magic of baking bring happiness to your kitchen!
PrintMaple Pumpkin Cookies: A Fall Treat You Can’t Miss!
Delicious and soft cookies infused with the flavors of maple and pumpkin, perfect for fall.
- Prep Time: 15 minutes
- Cook Time: 15 minutes
- Total Time: 30 minutes
- Yield: 24 cookies
- Category: Dessert
- Method: Baking
- Cuisine: American
- Diet: Vegetarian
Ingredients
- 1 cup pumpkin puree
- 1/2 cup maple syrup
- 1/2 cup brown sugar
- 1/2 cup butter, softened
- 1 egg
- 2 cups all-purpose flour
- 1 tsp baking soda
- 1 tsp baking powder
- 1 tsp cinnamon
- 1/2 tsp nutmeg
- 1/2 tsp salt
- 1/2 cup chopped walnuts (optional)
Instructions
- Preheat the oven to 350°F (175°C).
- In a large bowl, cream together the butter, brown sugar, and maple syrup until smooth.
- Add the pumpkin puree and egg, mixing until well combined.
- In another bowl, whisk together the flour, baking soda, baking powder, cinnamon, nutmeg, and salt.
- Gradually add the dry ingredients to the wet ingredients, mixing until just combined.
- If using, fold in the chopped walnuts.
- Drop spoonfuls of dough onto a baking sheet lined with parchment paper.
- Bake for 12-15 minutes or until the edges are lightly golden.
- Allow to cool on the baking sheet for a few minutes before transferring to a wire rack to cool completely.
Notes
- Store cookies in an airtight container for up to a week.
- For a sweeter cookie, add more maple syrup.
- These cookies can be frozen for up to 3 months.


