Irresistible Easy Halloween Oreo-Stuffed Cookies Recipe
As the leaves turn and the air gets crisp, I find myself craving cozy treats that bring a smile to my family’s faces. That’s where my Irresistible Easy Halloween Oreo-Stuffed Cookies Recipe comes in! These delightful cookies are not just a quick solution for a busy day; they’re a fun way to celebrate the season. With a gooey Oreo surprise hidden inside, they’re sure to impress your loved ones. Plus, they’re simple enough to whip up even on the busiest of days. Let’s dive into this festive baking adventure together!
Why You’ll Love This Irresistible Easy Halloween Oreo-Stuffed Cookies Recipe
This recipe is a lifesaver for busy moms and professionals like us! It’s quick, taking just 27 minutes from start to finish, and the taste? Absolutely divine! The combination of soft, chewy cookie dough and the surprise of an Oreo center is pure magic. Plus, these cookies are perfect for festive gatherings, making them a delightful treat that everyone will adore. You’ll be the star of the Halloween party!
Ingredients for Irresistible Easy Halloween Oreo-Stuffed Cookies Recipe
Gathering the right ingredients is the first step to creating these delightful cookies. Here’s what you’ll need:
- Unsalted butter: This adds richness and helps create a soft texture. Make sure it’s softened for easy mixing.
- Granulated sugar: Sweetens the cookies and contributes to their chewy texture.
- Brown sugar: Packed with moisture, it gives the cookies a deeper flavor and a hint of caramel.
- Large eggs: They bind the ingredients together and add moisture, making the cookies fluffy.
- Vanilla extract: A must for flavor! It enhances the sweetness and adds warmth to the cookies.
- All-purpose flour: The base of the cookie dough, providing structure and stability.
- Baking soda: This leavening agent helps the cookies rise and become light and airy.
- Salt: Just a pinch enhances the flavors and balances the sweetness.
- Chocolate chips: These add extra chocolatey goodness and a delightful texture contrast.
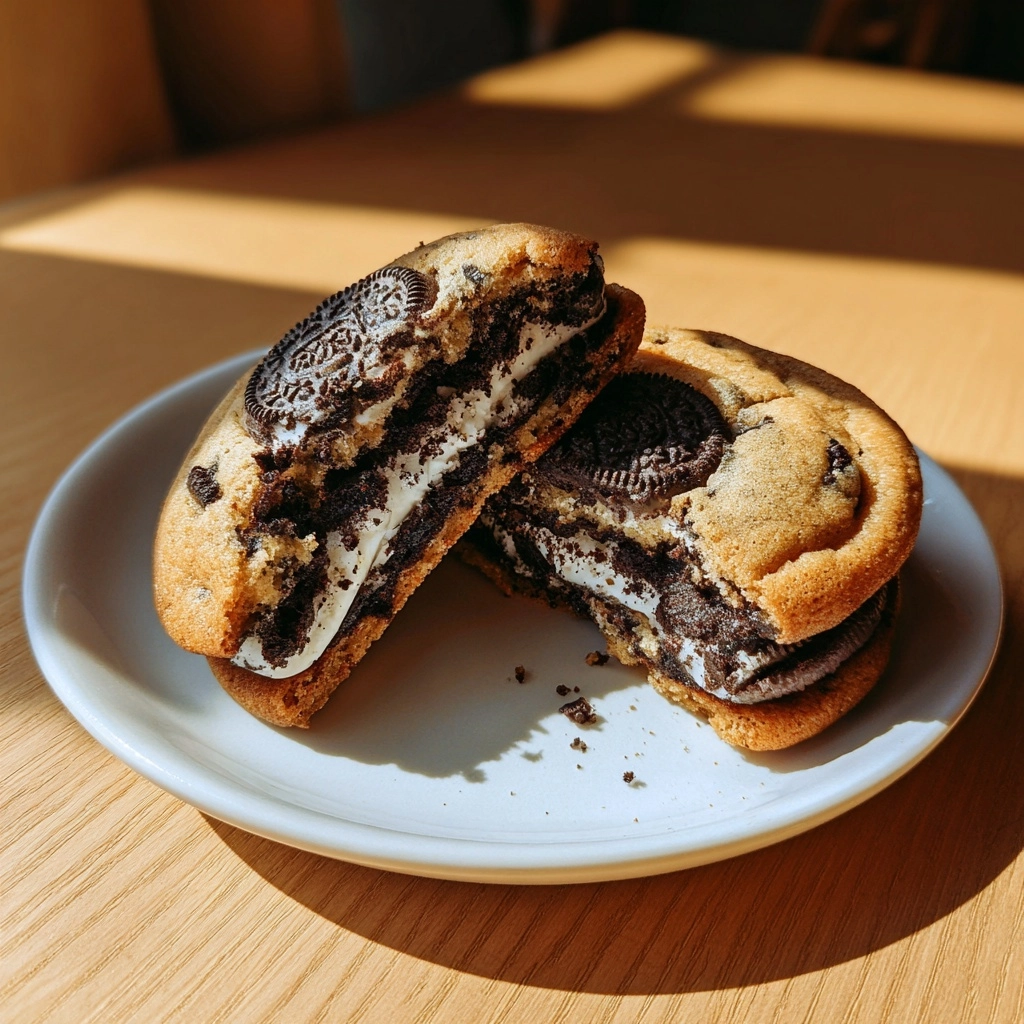
- Oreo cookies: The star of the show! These provide a fun surprise inside each cookie.
For a festive twist, consider using Halloween-themed Oreo cookies. You can find these at most grocery stores during the season. If you’re looking for alternatives, feel free to swap in gluten-free flour or dairy-free butter to suit your dietary needs. Exact measurements for each ingredient are available at the bottom of the article for easy printing!
How to Make Irresistible Easy Halloween Oreo-Stuffed Cookies Recipe
Step 1: Preheat the Oven
Preheating your oven to 350°F (175°C) is crucial for baking cookies. This ensures that the cookies start cooking evenly right from the moment they hit the hot surface. A properly preheated oven helps achieve that golden-brown edge while keeping the center soft and gooey. Trust me, it makes a difference!
Step 2: Cream the Butter and Sugars
In a large bowl, cream together the softened butter, granulated sugar, and brown sugar until smooth. This process is essential for creating a light and fluffy texture in your cookies. The air you incorporate while mixing helps them rise beautifully. Aim for a pale, creamy mixture that looks inviting and delicious!
Step 3: Add Eggs and Vanilla
Next, add the eggs and vanilla extract to the creamed mixture. The eggs bind everything together, while the vanilla adds a warm, sweet flavor. This combination is what makes your cookies taste so irresistible. Mix until everything is well combined, and you can almost smell the magic happening!
Step 4: Combine Dry Ingredients
In a separate bowl, whisk together the all-purpose flour, baking soda, and salt. Mixing these dry ingredients separately is important to ensure even distribution of the leavening agent. This step helps prevent any clumps and guarantees that every bite of your cookies is perfectly balanced in flavor.
Step 5: Mix Wet and Dry Ingredients
Now, gradually add the dry ingredients to the wet mixture. Stir gently until just combined. Be careful not to overmix, as this can lead to tough cookies. You want a soft dough that’s slightly sticky but holds together well. It’s all about that perfect balance!
Step 6: Fold in Chocolate Chips
Time to add the chocolate chips! Gently fold them into the dough, ensuring they’re evenly distributed. These little morsels of chocolate will melt slightly during baking, creating pockets of gooey goodness. They add a delightful texture and extra sweetness to your already amazing cookies!
Step 7: Stuff the Cookies
Take a small amount of cookie dough and flatten it in your palm. Place an Oreo in the center and encase it with the dough, rolling it into a ball. Make sure the Oreo is completely covered. This step is where the magic happens, as each cookie will have a delicious surprise inside!
Step 8: Bake the Cookies
Place the cookie balls on a baking sheet lined with parchment paper, spacing them about 2 inches apart. Bake for 10-12 minutes or until the edges are golden brown. Keep an eye on them; you want them to be soft in the center. They’ll continue to cook a bit after you take them out!
Step 9: Cool and Enjoy
Once baked, allow the cookies to cool on the baking sheet for a few minutes. This helps them set before transferring them to a wire rack. Enjoy them warm, or let them cool completely for a delightful treat later. Either way, you’re in for a delicious experience!
Tips for Success
- Use room temperature butter for easier creaming and a better texture.
- Don’t skip the preheating step; it’s key for even baking.
- Chill the dough for 30 minutes if it feels too sticky to handle.
- Experiment with different types of chocolate chips for added flavor.
- Keep an eye on the cookies while baking to avoid overcooking.
Equipment Needed
- Mixing bowls: A large bowl for mixing and a smaller one for dry ingredients. Any size will do!
- Electric mixer: A hand mixer works great, but a whisk and some elbow grease can do the job too.
- Baking sheet: Use any flat baking tray; just line it with parchment paper for easy cleanup.
- Cookie scoop: A spoon works fine, but a scoop ensures even-sized cookies.
- Wire rack: If you don’t have one, a plate will work for cooling the cookies.
Variations of Irresistible Easy Halloween Oreo-Stuffed Cookies Recipe
- Peanut Butter Surprise: Swap out the chocolate chips for peanut butter chips and use peanut butter Oreos for a nutty twist.
- Gluten-Free Option: Substitute all-purpose flour with a gluten-free blend to make these cookies suitable for gluten-sensitive friends.
- Minty Fresh: Use mint-flavored Oreos and add a few drops of peppermint extract for a refreshing flavor.
- White Chocolate Delight: Replace regular chocolate chips with white chocolate chips for a sweeter, creamier cookie.
- Nutty Addition: Fold in chopped nuts like walnuts or pecans for added crunch and flavor.
Serving Suggestions for Irresistible Easy Halloween Oreo-Stuffed Cookies Recipe
- Pair these cookies with a glass of cold milk for a classic treat.
- Serve them warm with a scoop of vanilla ice cream on top for an indulgent dessert.
- For a festive touch, arrange them on a Halloween-themed platter.
- Offer a side of whipped cream for dipping to elevate the experience.
FAQs about Irresistible Easy Halloween Oreo-Stuffed Cookies Recipe
Can I use different types of Oreos?
Absolutely! Feel free to experiment with different Oreo flavors, like pumpkin spice or mint. Each variation will give your cookies a unique twist, making them even more fun for Halloween!
How should I store the cookies?
Store your cookies in an airtight container at room temperature for up to a week. If you want to keep them longer, you can freeze them for up to three months. Just make sure to separate layers with parchment paper to prevent sticking!
Can I make the dough ahead of time?
Yes! You can prepare the dough a day in advance. Just cover it tightly and refrigerate. When you’re ready to bake, let it sit at room temperature for about 10 minutes before shaping and baking.
What if my dough is too sticky?
If your dough feels too sticky to handle, try chilling it in the refrigerator for about 30 minutes. This will make it easier to work with and help your cookies maintain their shape while baking.
Can I add other mix-ins to the cookies?
Definitely! Feel free to add nuts, dried fruit, or even different types of chocolate chips. Just remember to keep the balance so the cookies don’t become too heavy!
Summarizing the Joy of Irresistible Easy Halloween Oreo-Stuffed Cookies Recipe
There’s something truly magical about baking these Irresistible Easy Halloween Oreo-Stuffed Cookies. The joy of pulling a tray of warm, gooey cookies from the oven is unmatched. Each bite reveals a delightful Oreo surprise, making them a hit with kids and adults alike. They’re perfect for sharing at festive gatherings or enjoying during cozy family nights. Plus, the simplicity of the recipe means you can whip them up even on the busiest days. So, gather your loved ones, bake a batch, and let the laughter and sweet aromas fill your home this Halloween season!
PrintIrresistible Easy Halloween Oreo-Stuffed Cookies Recipe Awaits!
A delightful and easy recipe for Halloween-themed cookies stuffed with Oreos, perfect for festive gatherings.
- Prep Time: 15 minutes
- Cook Time: 12 minutes
- Total Time: 27 minutes
- Yield: 24 cookies
- Category: Dessert
- Method: Baking
- Cuisine: American
- Diet: Vegetarian
Ingredients
- 1 cup unsalted butter, softened
- 1 cup granulated sugar
- 1 cup brown sugar, packed
- 2 large eggs
- 2 teaspoons vanilla extract
- 3 cups all-purpose flour
- 1 teaspoon baking soda
- 1/2 teaspoon salt
- 1 cup chocolate chips
- 1 package Oreo cookies
Instructions
- Preheat your oven to 350°F (175°C).
- In a large bowl, cream together the softened butter, granulated sugar, and brown sugar until smooth.
- Add the eggs and vanilla extract, mixing until well combined.
- In a separate bowl, whisk together the flour, baking soda, and salt.
- Gradually add the dry ingredients to the wet ingredients, mixing until just combined.
- Fold in the chocolate chips.
- Take a small amount of cookie dough, flatten it, and place an Oreo in the center. Encase the Oreo with the dough and roll it into a ball.
- Place the cookie balls on a baking sheet lined with parchment paper, spacing them about 2 inches apart.
- Bake for 10-12 minutes or until the edges are golden brown.
- Allow the cookies to cool on the baking sheet for a few minutes before transferring them to a wire rack to cool completely.
Notes
- For a festive touch, use Halloween-themed Oreo cookies.
- Store cookies in an airtight container for up to a week.
- These cookies can be frozen for up to 3 months.