Grinch Balls Oreo
As the holiday season approaches, I find myself searching for festive treats that are both fun and easy to make. Enter Grinch Balls Oreo! These delightful no-bake treats are a whimsical twist on classic Oreos, perfect for busy moms like us who want to impress without spending hours in the kitchen. With just a handful of ingredients, you can whip up a batch that will bring smiles to your loved ones’ faces. Plus, they’re a fantastic way to get the kids involved in holiday baking. Let’s dive into this cheerful recipe!
Why You’ll Love This Grinch Balls Oreo
Grinch Balls Oreo are the ultimate holiday treat for busy families. They’re quick to make, requiring no baking at all, which means less time in the kitchen and more time enjoying the festivities. The combination of creamy, sweet cream cheese and crunchy Oreos creates a flavor explosion that’s hard to resist. Plus, they’re a hit with kids and adults alike, making them perfect for holiday gatherings or cozy nights in!
Ingredients for Grinch Balls Oreo
To create these festive Grinch Balls Oreo, you’ll need a few simple ingredients that pack a punch of flavor. Here’s what you’ll gather:
- Oreo cookies: The star of the show! These chocolatey cookies provide the perfect base for our treats.
- Cream cheese: This creamy goodness binds the crushed Oreos together, adding richness and a delightful texture.
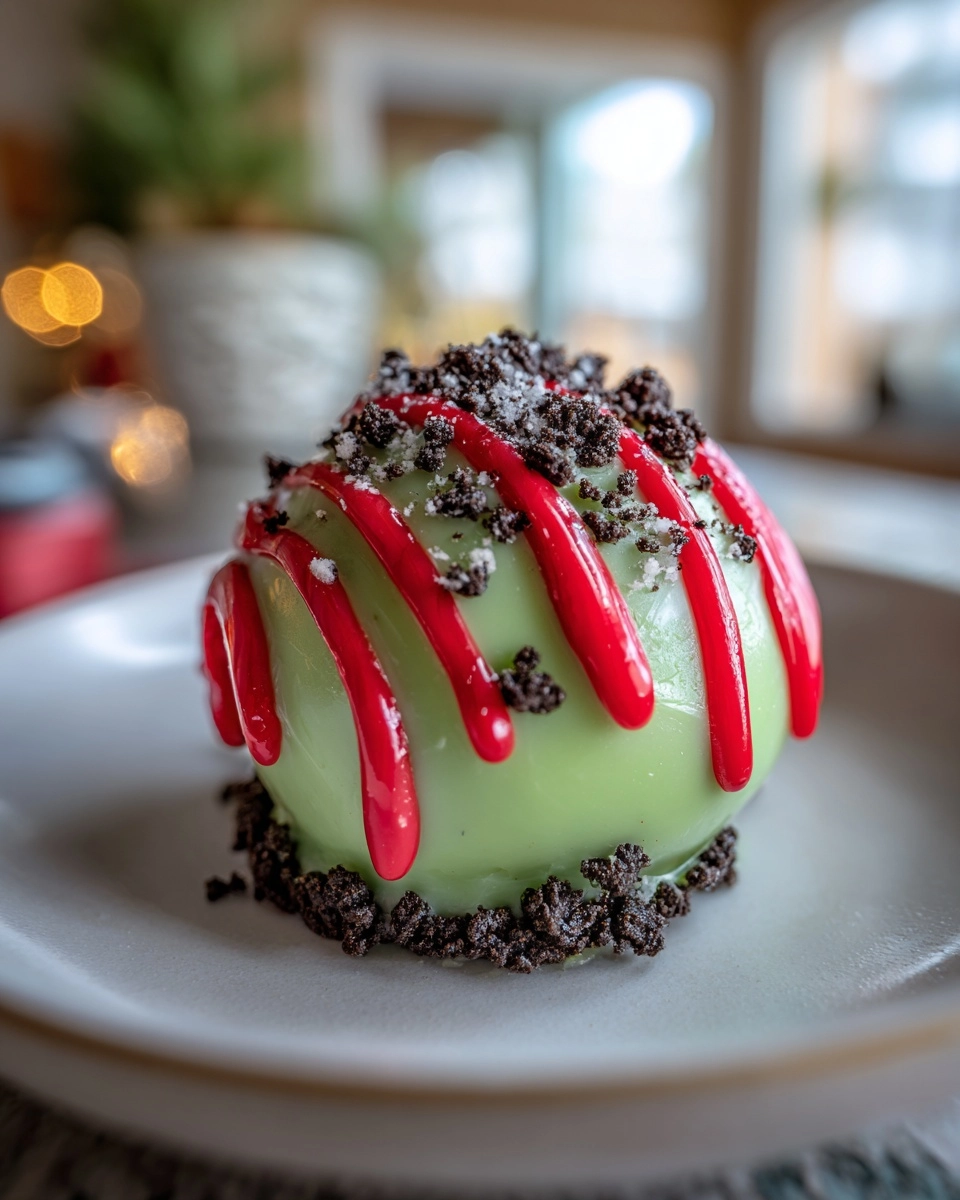
- Green candy melts: These are essential for that iconic Grinch color. They melt beautifully and create a sweet coating.
- Red candy melts: A fun addition for decorating! They’ll give your Grinch Balls a cute little nose.
- Mini chocolate chips: These tiny treats serve as the Grinch’s eyes, adding a touch of whimsy to each ball.
Feel free to get creative! You can swap out the candy melts for different colors to match your holiday theme. If you can’t find green candy melts, white chocolate works just as well with a bit of green food coloring. For exact measurements, check the bottom of the article where you can find everything you need for printing.
How to Make Grinch Balls Oreo
Making Grinch Balls Oreo is a delightful adventure that’s as easy as pie—well, easier actually! Follow these simple steps, and you’ll have a festive treat that’s sure to impress. Let’s get started!
Step 1: Crush the Oreos
First things first, grab your package of Oreo cookies. Place them in a food processor and pulse until they turn into fine crumbs. If you don’t have a food processor, a sturdy zip-top bag and a rolling pin work just as well. Just imagine the satisfying crunch as you crush those cookies!
Step 2: Mix with Cream Cheese
Next, in a mixing bowl, combine the crushed Oreos with softened cream cheese. Use a spatula or your hands to mix until everything is well blended. The mixture should be moist and hold together nicely. This is where the magic happens, as the cream cheese adds a rich creaminess to the cookies!
Step 3: Roll into Balls
Now, it’s time to roll! Take small portions of the mixture and roll them into balls, about one inch in diameter. Place them on a baking sheet lined with parchment paper. This step is perfect for getting the kids involved—let them roll their own Grinch Balls!
Step 4: Chill the Balls
Once you’ve rolled all the balls, pop them in the refrigerator for about 30 minutes. Chilling helps them firm up, making them easier to dip later. Plus, it gives you a little break to sip on some hot cocoa!
Step 5: Melt the Green Candy
While the balls chill, it’s time to melt the green candy melts. Place them in a microwave-safe bowl and heat in 30-second intervals, stirring in between until smooth. Be careful not to overheat; you want a silky consistency that will coat the balls perfectly.
Step 6: Dip the Balls
Now comes the fun part! Take each chilled ball and dip it into the melted green candy. Use a fork to lift it out, allowing any excess to drip off. Place the coated ball back on the parchment paper. The vibrant green will make your treats look just like the Grinch himself!
Step 7: Decorate with Chocolate Chips and Red Candy
While the green coating is still wet, it’s time to add some personality! Use mini chocolate chips for the Grinch’s eyes and a small dot of red candy melts for the nose. Get creative—each Grinch Ball can have its own unique expression!
Step 8: Let Set
Finally, let the Grinch Balls set until the candy coating hardens. This usually takes about 30 minutes at room temperature. Once they’re set, you can store them in an airtight container in the fridge. Just try not to eat them all at once—they’re that good!
Tips for Success
- Make sure your cream cheese is softened for easy mixing.
- Use a cookie scoop for uniform ball sizes.
- Chill the balls longer if they feel too soft to dip.
- Experiment with different candy melt colors for a fun twist.
- Keep a damp paper towel handy to clean your hands while rolling.
Equipment Needed
- Food processor: For crushing Oreos. A zip-top bag and rolling pin work too!
- Mixing bowl: Any large bowl will do for combining ingredients.
- Baking sheet: Line it with parchment paper for easy cleanup.
- Microwave-safe bowl: Essential for melting candy melts.
- Fork: Perfect for dipping and lifting the balls.
Variations
- For a minty twist, add a few drops of peppermint extract to the cream cheese mixture.
- Try using gluten-free Oreos for a gluten-free version of these treats.
- Substitute the cream cheese with a dairy-free alternative for a vegan option.
- Mix in some crushed peppermint candies for a festive crunch.
- Use white chocolate melts instead of green for a snowy Grinch look!
Serving Suggestions
- Pair Grinch Balls Oreo with a warm cup of hot cocoa for a cozy treat.
- Serve them on a festive platter, garnished with holiday sprinkles for extra cheer.
- Include them in a holiday dessert table alongside cookies and brownies.
- Wrap them in clear bags with ribbons for delightful gifts.
FAQs about Grinch Balls Oreo
Can I make Grinch Balls Oreo ahead of time?
Absolutely! These festive treats can be made a few days in advance. Just store them in an airtight container in the refrigerator. They’ll stay fresh and delicious, ready to impress your guests!
What can I use instead of candy melts?
If you can’t find candy melts, don’t worry! You can use white chocolate chips or even colored chocolate bars. Just melt them down and add a bit of food coloring if you want that vibrant Grinch green!
How do I store leftover Grinch Balls Oreo?
Store any leftovers in an airtight container in the fridge. They’ll keep well for up to a week. Just be sure to hide them from the kids if you want some for yourself!
Can I freeze Grinch Balls Oreo?
Yes, you can freeze these treats! Just place them in a single layer on a baking sheet until frozen, then transfer them to an airtight container. They’ll last for about a month in the freezer.
Are Grinch Balls Oreo suitable for kids?
Definitely! These no-bake treats are a hit with kids. They’re fun to make and even more fun to eat. Just keep an eye on the mini chocolate chips—they might disappear before you finish decorating!
Summarizing the Joy of Grinch Balls Oreo
Making Grinch Balls Oreo is more than just a recipe; it’s a delightful experience that brings the whole family together. The laughter shared while rolling the balls and the excitement of decorating them creates lasting memories. These treats not only satisfy your sweet tooth but also add a splash of festive cheer to any gathering. Whether you’re hosting a holiday party or enjoying a cozy night in, these no-bake delights are sure to spread joy. So, gather your loved ones, whip up a batch, and let the holiday spirit shine through every delicious bite!
PrintGrinch Balls Oreo: The Holiday Treat You’ll Love!

Grinch Balls Oreo are festive, no-bake treats that combine the deliciousness of Oreos with a fun holiday twist, perfect for Christmas celebrations.
- Prep Time: 20 minutes
- Cook Time: 0 minutes
- Total Time: 50 minutes
- Yield: 36 balls
- Category: Dessert
- Method: No-Bake
- Cuisine: American
- Diet: Vegetarian
Ingredients
- 1 package Oreo cookies (about 36 cookies)
- 8 oz cream cheese, softened
- 1 cup green candy melts
- 1/2 cup red candy melts
- 1/4 cup mini chocolate chips
Instructions
- Crush the Oreo cookies in a food processor until fine crumbs form.
- In a mixing bowl, combine the crushed Oreos with softened cream cheese and mix until well blended.
- Roll the mixture into small balls and place them on a baking sheet lined with parchment paper.
- Chill the balls in the refrigerator for about 30 minutes.
- Melt the green candy melts in a microwave-safe bowl, stirring until smooth.
- Dip each chilled ball into the melted green candy and place back on the parchment paper.
- While the green coating is still wet, add mini chocolate chips for eyes and a small amount of red candy melts for a nose.
- Let the Grinch Balls set until the candy coating hardens.
Notes
- For a fun variation, try using different colored candy melts.
- Store the Grinch Balls in an airtight container in the refrigerator for up to a week.
- These treats are great for holiday parties and as gifts!