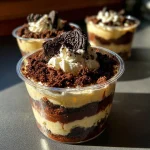
Graveyard Dirt Cake Cups
As the leaves turn and the air gets crisp, I can’t help but get excited about Halloween. One of my favorite treats to whip up is Graveyard Dirt Cake Cups. They’re not just delicious; they’re a fun way to get the kids involved in the kitchen! This recipe is perfect for busy moms like us, offering a quick solution for a festive dessert that will impress your loved ones. With layers of chocolate cake, creamy pudding, and crushed cookies, these spooky cups are sure to be a hit at any Halloween gathering!
Why You’ll Love This Graveyard Dirt Cake Cups
Graveyard Dirt Cake Cups are a delightful blend of ease and taste. They come together quickly, making them perfect for busy days when you need a sweet treat without the fuss. The rich chocolate flavor paired with creamy pudding is simply irresistible. Plus, the kids will love helping to layer the ingredients, turning dessert-making into a fun family activity. It’s a win-win for everyone!
Ingredients for Graveyard Dirt Cake Cups
Gathering the right ingredients is half the fun! For these Graveyard Dirt Cake Cups, you’ll need a few simple items that you can easily find at your local grocery store. Here’s what you’ll need:
- Chocolate cake mix: This is the base of our dessert, providing that rich, chocolatey goodness.
- Chocolate pudding mix: Adds a creamy layer that complements the cake perfectly.
- Milk: Essential for making the pudding smooth and luscious.
- Whipped topping: This lightens up the pudding and gives it a fluffy texture.
- Chocolate sandwich cookies: Crushed to create the “dirt” layer, these add a delightful crunch.
- Gummy worms: A fun decoration that brings the spooky theme to life!
- Plastic spiders: Perfect for that extra creepy touch, making your dessert look like a graveyard.
For those with dietary restrictions, you can easily swap in gluten-free chocolate cake mix and cookies. Feel free to get creative with decorations too! Edible eyes or Halloween-themed sprinkles can add a festive flair. If you’re short on time, these cups can be made a day in advance, making them a convenient treat for your Halloween festivities. Exact quantities for each ingredient are available at the bottom of the article for easy printing!
How to Make Graveyard Dirt Cake Cups
Step 1: Prepare the Chocolate Cake
To kick off this spooky dessert, start by preparing the chocolate cake mix according to the package instructions. It’s as easy as mixing the ingredients and pouring the batter into a 9×13 inch pan. Bake it until a toothpick comes out clean, usually around 30 minutes. The aroma of chocolate wafting through your kitchen will have everyone eagerly waiting! Once baked, let it cool completely on a wire rack. This step is crucial for achieving the perfect texture for our Graveyard Dirt Cake Cups.
Step 2: Crumble the Cake
Once the cake has cooled, it’s time for some fun! Crumble the cake into small pieces using your hands or a fork. Aim for a mix of fine crumbs and larger chunks for texture. This crumbled cake will serve as the foundation of our dessert, creating that delightful “dirt” layer. Don’t worry about making it perfect; the more rustic, the better! Set the crumbled cake aside while you prepare the pudding mixture.
Step 3: Make the Pudding Mixture
In a separate bowl, whisk together the chocolate pudding mix and milk until smooth. This step is where the magic happens! The pudding should be thick and creamy, ready to complement our chocolate cake. I love using a whisk for this, as it helps to incorporate air and create a light texture. Once it’s well combined, set it aside for a moment. We’re about to make this dessert even more delicious!
Step 4: Fold in Whipped Topping
Now, let’s add some fluffiness to our pudding! Gently fold in the whipped topping into the pudding mixture until it’s well combined. This step is key to achieving that light, airy texture that makes these Graveyard Dirt Cake Cups so delightful. Be careful not to overmix; we want to keep that lovely volume. The mixture should look smooth and creamy, ready to layer with our crumbled cake.
Step 5: Layer the Ingredients
Grab your clear cups, and let’s start layering! Begin with a generous layer of crumbled chocolate cake at the bottom. Next, spoon in a layer of the creamy pudding mixture, followed by a sprinkle of crushed chocolate sandwich cookies to create that “dirt” effect. Repeat these layers until the cups are filled, finishing with a layer of crushed cookies on top. The visual appeal of these layers is just as important as the taste, so have fun with it! Each cup should look like a mini graveyard.
Step 6: Decorate and Chill
Now for the fun part—decorating! Top each cup with gummy worms and plastic spiders for that spooky Halloween touch. It’s amazing how these little details can transform your dessert into a festive centerpiece. Once decorated, chill the cups in the refrigerator for at least 1 hour before serving. This chilling time allows the flavors to meld together beautifully. Plus, it makes for a refreshing treat on a crisp fall evening!
Tips for Success
- Make sure your cake is completely cool before crumbling; this helps prevent a soggy texture.
- Use a clear cup to showcase the beautiful layers of your Graveyard Dirt Cake Cups.
- Get the kids involved in decorating; it’s a fun way to bond and unleash creativity!
- For a richer flavor, consider adding a splash of vanilla extract to the pudding mixture.
- Don’t hesitate to experiment with different toppings like crushed candy or sprinkles!
Equipment Needed
- 9×13 inch baking pan: A standard size for baking the cake; a round pan works too!
- Mixing bowls: Use any size you have on hand for mixing ingredients.
- Whisk: A fork can substitute if you don’t have one.
- Clear cups: Mason jars or small bowls can be fun alternatives.
- Spatula: A rubber spatula is great for folding in the whipped topping.
Variations of Graveyard Dirt Cake Cups
- Gluten-Free Version: Swap in gluten-free chocolate cake mix and gluten-free chocolate sandwich cookies for a delicious alternative.
- Vegan Option: Use a vegan chocolate cake mix, almond milk, and coconut whipped cream to create a plant-based treat everyone can enjoy.
- Flavor Twists: Experiment with different pudding flavors like vanilla or butterscotch for a unique spin on the classic recipe.
- Fruit Additions: Layer in some fresh berries or banana slices between the cake and pudding for a fruity surprise.
- Nutty Crunch: Add crushed nuts or granola between the layers for an extra crunch and flavor boost.
Serving Suggestions for Graveyard Dirt Cake Cups
- Pair with a warm cup of apple cider for a cozy fall treat.
- Serve alongside spooky-themed cookies or cupcakes for a festive dessert table.
- Consider using Halloween-themed plates and napkins to enhance the presentation.
- For a fun twist, add dry ice for a foggy effect during serving!
FAQs about Graveyard Dirt Cake Cups
Can I make Graveyard Dirt Cake Cups in advance?
Absolutely! These cups can be made a day in advance. Just keep them covered in the refrigerator until you’re ready to serve. This not only saves time but also allows the flavors to meld beautifully.
How can I make these cups gluten-free?
To create a gluten-free version of Graveyard Dirt Cake Cups, simply use gluten-free chocolate cake mix and gluten-free chocolate sandwich cookies. They’ll taste just as delicious!
What can I use instead of chocolate sandwich cookies?
If you want to switch things up, consider using crushed graham crackers or even vanilla wafers. They’ll still give you that “dirt” effect while adding a different flavor profile.
Can I use homemade pudding instead of instant pudding mix?
Yes, you can! Just make sure your homemade pudding is thick enough to layer properly. It’ll add a lovely homemade touch to your Graveyard Dirt Cake Cups.
What other decorations can I use for a spooky effect?
Get creative! You can use edible eyes, Halloween-themed sprinkles, or even chocolate spiders. The more festive, the better! Your imagination is the limit!
Summarizing the Joy of Graveyard Dirt Cake Cups
Creating Graveyard Dirt Cake Cups is more than just making a dessert; it’s about crafting memories with your loved ones. The laughter shared while layering the ingredients and the excitement of decorating with gummy worms and plastic spiders bring a sense of joy to the kitchen. Each cup is a delightful surprise, combining rich chocolate flavors with a playful presentation. As you serve these spooky treats at your Halloween gathering, you’ll witness the smiles and delight on everyone’s faces. It’s a simple yet magical way to celebrate the season and create lasting family traditions!
PrintGraveyard Dirt Cake Cups: A Spooktacular Treat Awaits!
Graveyard Dirt Cake Cups are a fun and spooky dessert perfect for Halloween parties, featuring layers of chocolate cake, creamy pudding, and crushed cookies.
- Prep Time: 30 minutes
- Cook Time: 30 minutes
- Total Time: 1 hour
- Yield: 12 servings
- Category: Dessert
- Method: Baking and Layering
- Cuisine: American
- Diet: Vegetarian
Ingredients
- 1 box chocolate cake mix
- 1 box chocolate pudding mix
- 2 cups milk
- 1 container whipped topping
- 1 package chocolate sandwich cookies
- Gummy worms (for decoration)
- Plastic spiders (for decoration)
Instructions
- Prepare the chocolate cake mix according to package instructions and bake in a 9×13 inch pan.
- Once baked, let the cake cool completely, then crumble it into small pieces.
- In a separate bowl, whisk together the chocolate pudding mix and milk until smooth.
- Fold in the whipped topping into the pudding mixture until well combined.
- In clear cups, layer the crumbled chocolate cake, pudding mixture, and crushed chocolate sandwich cookies.
- Repeat the layers until the cups are filled, finishing with a layer of crushed cookies on top.
- Decorate with gummy worms and plastic spiders for a spooky effect.
- Chill in the refrigerator for at least 1 hour before serving.
Notes
- For a gluten-free version, use gluten-free chocolate cake mix and cookies.
- Feel free to add other decorations like edible eyes or Halloween-themed sprinkles.
- These can be made a day in advance for convenience.