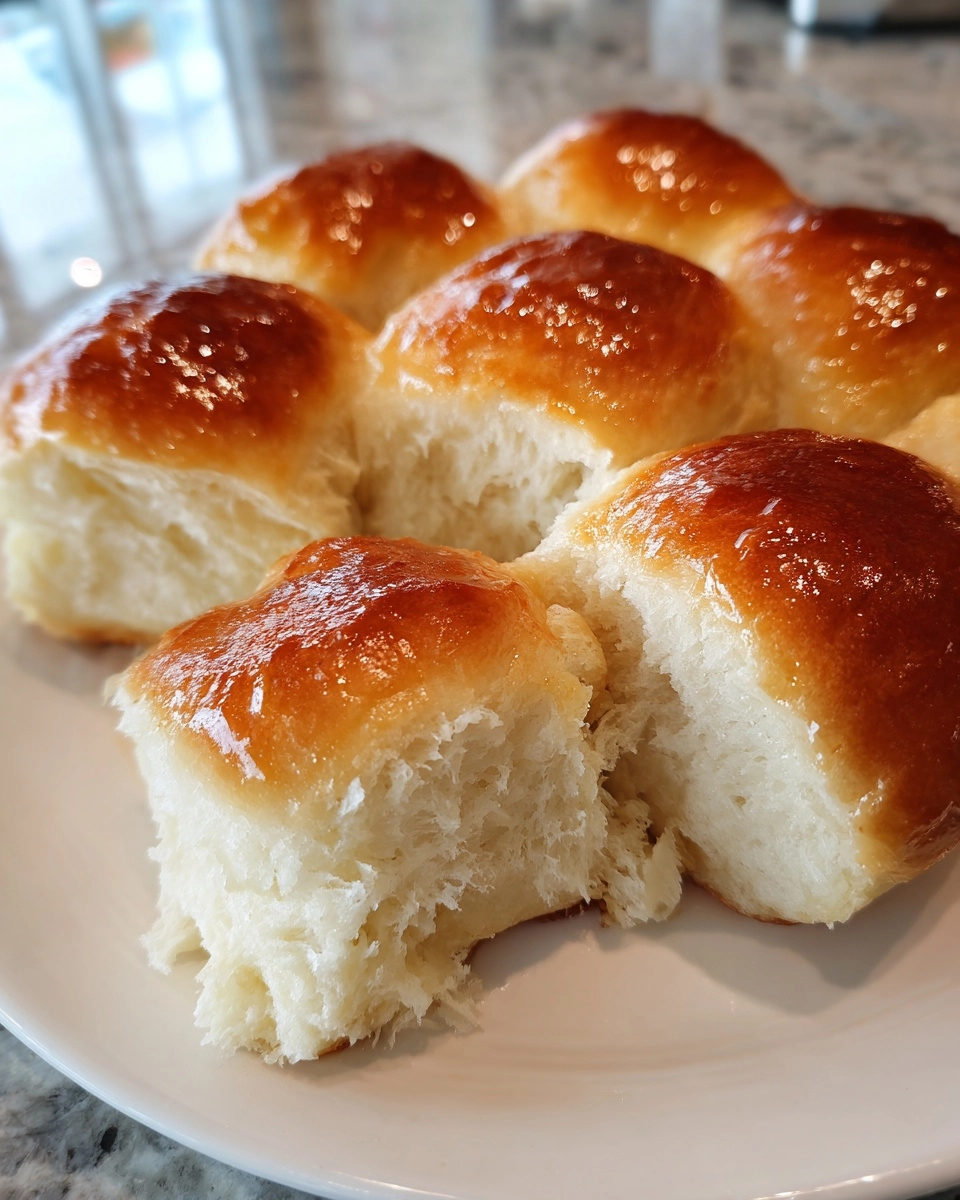
Gluten-Free Dinner Rolls: Perfect for Your Holiday Feast!
As the holiday season approaches, I find myself dreaming of warm, fluffy gluten-free dinner rolls. These little gems are not just a side dish; they’re a hug on a plate! If you’re like me, juggling a busy schedule while trying to impress family and friends, this recipe is your secret weapon. With just a few simple ingredients, you can whip up a batch of these delightful rolls that will have everyone asking for seconds. Trust me, they’re the perfect addition to your holiday feast, bringing comfort and joy to your table.
Why You’ll Love This Gluten-Free Dinner Rolls
These gluten-free dinner rolls are a game changer for your holiday gatherings. They’re incredibly easy to make, even for those of us who feel like we’re constantly racing against the clock. The taste? Oh, it’s simply divine! Fluffy, warm, and slightly sweet, they’ll have your loved ones raving. Plus, they’re gluten-free, so everyone can enjoy them without worry. What’s not to love about that?
Ingredients for Gluten-Free Dinner Rolls
Gathering the right ingredients is the first step to creating these delightful gluten-free dinner rolls. Here’s what you’ll need:
- Gluten-free all-purpose flour: This is the star of the show! It provides the structure and fluffiness. Look for a blend that includes xanthan gum for the best results.
- Sugar: Just a tablespoon adds a hint of sweetness, balancing the flavors beautifully.
- Salt: A pinch of salt enhances the overall taste, making each bite more flavorful.
- Instant yeast: This magical ingredient helps the rolls rise quickly, giving them that light and airy texture.
- Warm water: It activates the yeast, so make sure it’s warm but not too hot—think cozy bath temperature!
- Olive oil: This adds moisture and richness to the rolls, making them irresistibly soft.
- Large eggs: Eggs help bind everything together and contribute to the rolls’ lovely texture.
For those who want to experiment, you can try adding herbs or garlic powder for a flavor twist. If you’re in a pinch, you can substitute the olive oil with melted butter or another neutral oil. Remember, the exact measurements are at the bottom of the article, ready for you to print and keep handy!
How to Make Gluten-Free Dinner Rolls
Step 1: Combine Dry Ingredients
Start by grabbing a large bowl. In it, mix together the gluten-free all-purpose flour, sugar, salt, and instant yeast. Stir them well to ensure everything is evenly distributed. This step is crucial because it sets the foundation for your gluten-free dinner rolls. A good mix means a better rise!
Step 2: Mix Wet Ingredients
In a separate bowl, whisk together the warm water, olive oil, and eggs. Make sure the water is warm, not hot, to keep the yeast happy. This mixture will bring moisture and richness to your rolls. It’s like a warm hug for your dry ingredients!
Step 3: Form the Dough
Now, gradually pour the wet ingredients into the dry mixture. Stir with a wooden spoon or spatula until a dough forms. It should be slightly sticky but manageable. If it feels too dry, add a splash more water. This dough is the heart of your gluten-free dinner rolls!
Step 4: Let the Dough Rise
Cover the bowl with a clean towel and place it in a warm spot. Let the dough rise for about 30 minutes. This is where the magic happens! The yeast will work its wonders, making your rolls fluffy and light. You can use this time to tidy up your kitchen or sip on a warm cup of tea.
Step 5: Preheat the Oven
While the dough is rising, preheat your oven to 375°F (190°C). This ensures that your rolls will bake evenly and come out perfectly golden brown. A hot oven is key to achieving that delightful crust!
Step 6: Shape the Rolls
Once the dough has risen, it’s time to shape it into rolls. Lightly flour your hands with gluten-free flour to prevent sticking. Pinch off small pieces of dough and roll them into balls. Place them on a baking sheet lined with parchment paper, leaving some space between each roll for expansion.
Step 7: Bake the Rolls
Pop the baking sheet into the preheated oven and bake for 20-25 minutes. Keep an eye on them! You want them to be golden brown on top. The aroma wafting through your kitchen will be irresistible, and your family will start gathering around!
Step 8: Cool and Serve
Once baked, remove the rolls from the oven and let them cool slightly on a wire rack. This step is important; it allows the steam to escape, keeping the rolls from getting soggy. Serve them warm, and watch as everyone dives in for a taste of your delicious gluten-free dinner rolls!
Tips for Success
- Use a kitchen scale for precise measurements, especially with gluten-free flour.
- Let your dough rise in a warm, draft-free area for the best results.
- Don’t skip the parchment paper; it prevents sticking and makes cleanup a breeze.
- For extra flavor, brush the rolls with melted butter right after baking.
- Experiment with different gluten-free flour blends to find your favorite!
Equipment Needed
- Large mixing bowl: A sturdy bowl for combining ingredients. A glass or ceramic bowl works well.
- Whisk: For mixing wet ingredients. A fork can also do the trick!
- Wooden spoon or spatula: Perfect for stirring the dough. A silicone spatula is great for scraping.
- Baking sheet: A flat surface for baking. If you don’t have one, a large oven-safe dish will work.
- Parchment paper: To line your baking sheet. If unavailable, greasing the sheet is a good alternative.
Variations for Gluten-Free Dinner Rolls
- Herb-Infused Rolls: Add dried herbs like rosemary or thyme to the dough for a fragrant twist.
- Garlic Dinner Rolls: Mix in minced garlic or garlic powder for a savory flavor that pairs beautifully with any meal.
- Cheesy Rolls: Fold in shredded cheese, like cheddar or mozzarella, for a rich, cheesy delight.
- Sweet Rolls: Incorporate cinnamon and a touch of brown sugar for a sweet version, perfect for breakfast or brunch.
- Seed Topping: Sprinkle sesame or poppy seeds on top before baking for added texture and flavor.
Serving Suggestions for Gluten-Free Dinner Rolls
- Pair with Gravy: These rolls are perfect for soaking up rich gravies or sauces.
- Serve with Butter: A pat of herb-infused butter adds a delightful touch.
- Accompany with Soup: They make a great side for hearty soups or stews.
- Presentation: Arrange them in a basket lined with a festive cloth for a beautiful display.
- Drink Pairing: Enjoy with a glass of sparkling cider or a warm herbal tea.
FAQs about Gluten-Free Dinner Rolls
Can I make these gluten-free dinner rolls ahead of time?
Absolutely! You can prepare the dough and shape the rolls, then refrigerate them overnight. Just let them rise for about 30 minutes before baking. This way, you can enjoy fresh rolls without the last-minute rush!
What can I use instead of gluten-free flour?
If you don’t have gluten-free all-purpose flour, you can try a homemade blend of almond flour and tapioca starch. Just remember, the texture may vary slightly, but they’ll still be delicious!
How do I store leftover rolls?
Store any leftover gluten-free dinner rolls in an airtight container at room temperature for up to two days. For longer storage, freeze them in a zip-top bag. Just reheat in the oven before serving!
Can I use active dry yeast instead of instant yeast?
Yes, you can! Just remember to activate the active dry yeast in warm water with a pinch of sugar before adding it to the dough. This will ensure your rolls rise beautifully!
What’s the best way to reheat gluten-free dinner rolls?
The best way to reheat them is in the oven. Preheat to 350°F (175°C) and warm the rolls for about 10 minutes. This keeps them soft and fluffy, just like when they were fresh!
Summarizing the Joy of Gluten-Free Dinner Rolls
There’s something truly magical about pulling a batch of gluten-free dinner rolls from the oven. The warm, inviting aroma fills your home, wrapping everyone in a cozy embrace. Watching loved ones gather around the table, eagerly reaching for these fluffy delights, brings a smile to my face. These rolls are more than just a side dish; they’re a symbol of togetherness and celebration. With each bite, you’re not just tasting the love and effort put into them, but also creating cherished memories. So, let these gluten-free dinner rolls be the highlight of your holiday feast, spreading joy and warmth to all!
PrintGluten-Free Dinner Rolls: Perfect for Your Holiday Feast!
Delicious and fluffy gluten-free dinner rolls, perfect for your holiday feast.
- Prep Time: 15 minutes
- Cook Time: 25 minutes
- Total Time: 40 minutes
- Yield: 12 rolls
- Category: Bread
- Method: Baking
- Cuisine: American
- Diet: Gluten Free
Ingredients
- 2 cups gluten-free all-purpose flour
- 1 tablespoon sugar
- 1 teaspoon salt
- 1 tablespoon instant yeast
- 1 cup warm water
- 1/4 cup olive oil
- 2 large eggs
Instructions
- In a large bowl, combine gluten-free flour, sugar, salt, and instant yeast.
- In a separate bowl, whisk together warm water, olive oil, and eggs.
- Gradually add the wet ingredients to the dry ingredients, mixing until a dough forms.
- Cover the bowl with a clean towel and let the dough rise in a warm place for about 30 minutes.
- Preheat the oven to 375°F (190°C).
- Shape the dough into small rolls and place them on a baking sheet lined with parchment paper.
- Bake for 20-25 minutes or until golden brown.
- Let cool slightly before serving.
Notes
- For best results, use a gluten-free flour blend that contains xanthan gum.
- These rolls can be frozen after baking; reheat in the oven before serving.
- Adjust the baking time based on your oven’s performance.