
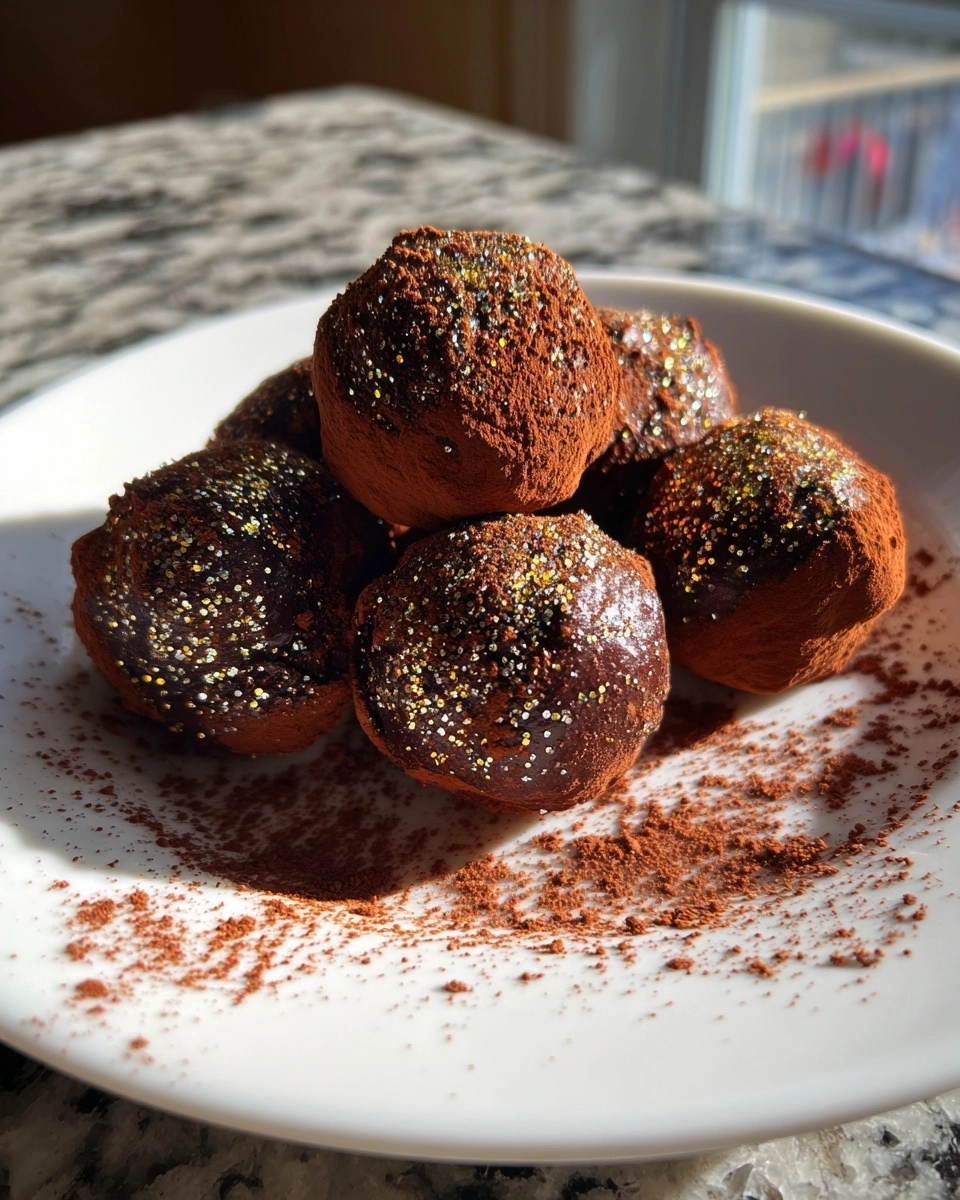
Christmas Truffles
Ah, the holiday season! It’s a time filled with joy, laughter, and, of course, delicious treats. If you’re like me, you’re always on the lookout for quick and delightful recipes that can impress your loved ones without taking up too much of your precious time. That’s where these Christmas truffles come in! They’re not just easy to make; they’re also a festive delight that will have everyone asking for seconds. Imagine the smiles on your family’s faces as they indulge in these creamy, chocolatey bites of joy. Let’s dive into this simple yet scrumptious recipe!
Why You’ll Love This Christmas Truffles
These Christmas truffles are a lifesaver for busy moms and professionals alike. They come together in just 20 minutes, making them a perfect last-minute treat for holiday gatherings. The rich, creamy texture paired with the chocolatey goodness is simply irresistible. Plus, you can customize them to suit your family’s tastes. With minimal effort, you’ll create a festive dessert that brings joy to your celebrations!
Ingredients for Christmas Truffles
Gathering the right ingredients is the first step to creating these delightful Christmas truffles. Here’s what you’ll need:
- Cream Cheese: This is the base of our truffles, providing a rich and creamy texture that melts in your mouth.
- Powdered Sugar: Sweetness is key! This ingredient helps balance the cream cheese and adds a smooth finish.
- Crushed Graham Crackers: These add a delightful crunch and a hint of flavor, reminiscent of a classic cheesecake.
- Semi-Sweet Chocolate Chips: The star of the show! They bring that luscious chocolate flavor that everyone loves.
- Vanilla Extract: A splash of this adds warmth and depth to the truffles, enhancing the overall taste.
- Cocoa Powder: This is for rolling the truffles, giving them a beautiful finish and an extra chocolatey kick.
- Chopped Nuts (optional): If you want to add a nutty crunch, feel free to toss in some chopped nuts of your choice!
For those who want to switch things up, consider adding a splash of peppermint extract for a festive twist. You can find all the exact measurements at the bottom of the article, ready for printing. Happy cooking!
How to Make Christmas Truffles
Step 1: Prepare the Mixture
Let’s kick things off by making the base of our Christmas truffles. In a mixing bowl, combine the softened cream cheese and powdered sugar. Use a hand mixer or a sturdy spatula to blend them until the mixture is smooth and creamy. This step is crucial, as it sets the stage for the delightful texture of your truffles. You want it to be fluffy, not lumpy! Trust me, this creamy goodness is what makes these truffles so irresistible. Once you’ve achieved that perfect consistency, you’re ready to move on to the next step!
Step 2: Add Flavor and Texture
Now, it’s time to amp up the flavor! Add the crushed graham crackers, semi-sweet chocolate chips, and a splash of vanilla extract to your creamy mixture. Stir everything together until well combined. The graham crackers will give your truffles a delightful crunch, while the chocolate chips add that rich, decadent flavor we all crave during the holidays. Don’t be shy—mix it well! You want every bite to be bursting with flavor. This is where the magic happens, so enjoy the process and let your kitchen fill with those festive aromas!
Step 3: Chill the Mixture
Once your mixture is well combined, it’s time to chill! Cover the bowl with plastic wrap and pop it in the refrigerator for about 30 minutes. Chilling helps the mixture firm up, making it easier to shape into truffles later. Plus, it allows the flavors to meld together beautifully. While you wait, you can sip on some hot cocoa or catch up on your favorite holiday movie. It’s a win-win!
Step 4: Shape the Truffles
After the mixture has chilled, it’s time for the fun part—shaping the truffles! Using a small cookie scoop or your hands, scoop out small portions of the mixture. Roll each portion into a ball, about the size of a walnut. Don’t worry if they aren’t perfect; a little rustic charm adds to their homemade appeal! As you roll, you might find yourself sneaking a taste here and there. I won’t tell! Once you’ve shaped all the truffles, you’re ready to coat them.
Step 5: Coat the Truffles
Now, let’s give those truffles a beautiful finish! You can roll each truffle in cocoa powder for a classic touch or opt for chopped nuts for a delightful crunch. If you’re feeling adventurous, try sprinkles or shredded coconut for a festive flair! Make sure each truffle is well-coated, as this adds an extra layer of flavor and texture. It’s like dressing them up for a holiday party! Once coated, place them on a baking sheet lined with parchment paper.
Step 6: Refrigerate and Serve
Finally, it’s time to let the truffles firm up. Place the baking sheet in the refrigerator and let the truffles chill until they are firm, about 30 minutes. Once they’re set, they’re ready to be served! Enjoy them chilled, and watch as your family and friends savor each bite. These Christmas truffles are sure to be a hit at any holiday gathering!
Tips for Success
- Make sure your cream cheese is softened for easy mixing.
- Chill the mixture long enough to ensure it’s firm for shaping.
- Use a cookie scoop for uniform truffle sizes.
- Experiment with different coatings like crushed candy canes for a festive twist.
- Store truffles in an airtight container to keep them fresh.
Equipment Needed
- Mixing Bowl: A large bowl for combining ingredients. A sturdy glass or ceramic bowl works well.
- Hand Mixer or Spatula: Use a hand mixer for ease, or a spatula for a good workout!
- Cookie Scoop: This helps shape uniform truffles. A tablespoon works in a pinch.
- Baking Sheet: A simple sheet lined with parchment paper for easy cleanup.
Variations of Christmas Truffles
- Peppermint Chocolate Truffles: Add a teaspoon of peppermint extract to the mixture for a refreshing holiday twist.
- Nutty Delight: Incorporate chopped nuts like walnuts or pecans into the mixture for added crunch and flavor.
- White Chocolate Truffles: Substitute semi-sweet chocolate chips with white chocolate chips for a sweeter, creamier version.
- Vegan Truffles: Use vegan cream cheese and dairy-free chocolate chips to create a plant-based treat everyone can enjoy.
- Spiced Truffles: Add a pinch of cinnamon or nutmeg to the mixture for a warm, spiced flavor that’s perfect for the season.
Serving Suggestions for Christmas Truffles
- Pair with a warm cup of hot cocoa or spiced apple cider for a cozy treat.
- Serve on a festive platter, garnished with fresh mint leaves for a pop of color.
- Include a variety of truffle flavors for a delightful dessert spread.
- Wrap individual truffles in colorful foil for a charming gift idea.
FAQs about Christmas Truffles
Can I make Christmas truffles ahead of time?
Absolutely! These truffles can be made a few days in advance. Just store them in an airtight container in the fridge. They’ll stay fresh and delicious, ready to impress your guests!
What can I use instead of cream cheese?
If you’re looking for a dairy-free option, try using vegan cream cheese. It works wonderfully and keeps the truffles creamy and delightful. You won’t miss the traditional cream cheese at all!
How long do Christmas truffles last?
When stored properly in the fridge, these Christmas truffles can last up to a week. Just make sure they’re in an airtight container to keep them fresh and tasty!
Can I freeze Christmas truffles?
Yes, you can freeze them! Just place the truffles in a single layer on a baking sheet until firm, then transfer them to a freezer-safe container. They’ll be good for up to three months. Just thaw them in the fridge before serving!
What are some creative coating options for Christmas truffles?
Get creative! Besides cocoa powder and chopped nuts, you can use crushed candy canes, sprinkles, or even shredded coconut. Each coating adds a unique twist to your festive treats!
Summarizing the Joy of Christmas Truffles
Making Christmas truffles is more than just a recipe; it’s a delightful experience that brings warmth and joy to the holiday season. The simple act of mixing, shaping, and coating these treats can turn a busy day into a cherished memory. As you share these creamy, chocolatey bites with family and friends, you’ll witness the smiles and laughter that fill the room. Each truffle is a little piece of happiness, reminding us of the joy of giving and celebrating together. So, roll up your sleeves and let the magic of Christmas truffles fill your home with love and cheer!
PrintChristmas truffles: Discover Irresistible Recipes Today!
Delicious and festive Christmas truffles that are perfect for holiday celebrations.
- Prep Time: 20 minutes
- Cook Time: 0 minutes
- Total Time: 50 minutes
- Yield: 24 truffles
- Category: Dessert
- Method: No-bake
- Cuisine: American
- Diet: Vegetarian
Ingredients
- 8 oz cream cheese, softened
- 2 cups powdered sugar
- 1 cup crushed graham crackers
- 1 cup semi-sweet chocolate chips
- 1 tsp vanilla extract
- 1/2 cup cocoa powder (for rolling)
- 1/2 cup chopped nuts (optional)
Instructions
- In a mixing bowl, combine softened cream cheese and powdered sugar until smooth.
- Add crushed graham crackers, chocolate chips, and vanilla extract. Mix until well combined.
- Chill the mixture in the refrigerator for about 30 minutes.
- Once chilled, scoop out small portions and roll them into balls.
- Roll the truffles in cocoa powder or chopped nuts to coat.
- Place the truffles on a baking sheet and refrigerate until firm.
- Serve chilled and enjoy your festive treat!
Notes
- For a different flavor, try adding peppermint extract.
- These truffles can be stored in an airtight container in the refrigerator for up to a week.
- Feel free to customize the coatings with sprinkles or shredded coconut.