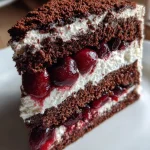
Mile-High Black Forest Cake
There’s something magical about a slice of Mile-High Black Forest Cake that brings a smile to my face. It’s rich, indulgent, and layered with cherries and whipped cream, making it the perfect treat for any special occasion. As a busy mom, I know how important it is to have a go-to dessert that impresses without taking all day to prepare. This cake is not just a feast for the eyes; it’s a delightful way to celebrate life’s little moments. So, let’s dive into this delicious adventure together!
Why You’ll Love This Mile-High Black Forest Cake
This Mile-High Black Forest Cake is a dream come true for busy moms and professionals alike. It’s not only easy to make, but it also delivers a burst of flavor that will leave your loved ones asking for seconds. The combination of rich chocolate, tart cherries, and fluffy whipped cream creates a symphony of taste. Plus, it’s a showstopper that will impress at any gathering, making you the star of the dessert table!
Ingredients for Mile-High Black Forest Cake
Gathering the right ingredients is the first step to creating your Mile-High Black Forest Cake. Here’s what you’ll need:
- All-purpose flour: This is the backbone of your cake, providing structure and texture.
- Granulated sugar: Sweetens the cake and helps it rise, giving it that delightful fluffiness.
- Unsweetened cocoa powder: Adds rich chocolate flavor; for a deeper taste, consider using dark cocoa.
- Baking powder and baking soda: These leavening agents help the cake rise, making it light and airy.
- Salt: Enhances the flavors and balances the sweetness.
- Large eggs: They bind the ingredients together and add moisture.
- Whole milk: Contributes to the cake’s richness and keeps it moist.
- Vegetable oil: Keeps the cake tender; you can substitute with melted butter for a richer flavor.
- Vanilla extract: A must-have for that warm, comforting aroma and flavor.
- Boiling water: This may sound odd, but it helps to bloom the cocoa, intensifying the chocolate flavor.
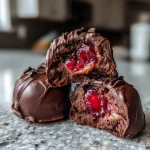
- Morello cherries: These tart cherries are the star of the show, adding a burst of flavor between the layers.
- Heavy whipping cream: Essential for that luscious whipped topping; it’s what makes this cake feel indulgent.
- Powdered sugar: Sweetens the whipped cream and helps it hold its shape.
- Chocolate shavings: For garnish, they add a touch of elegance and extra chocolatey goodness.
For exact measurements, check the bottom of the article where you can find everything listed for easy printing. Happy baking!
How to Make Mile-High Black Forest Cake
Step 1: Preheat and Prepare
Let’s kick things off by preheating your oven to 350°F (175°C). This step is crucial for ensuring your cake rises beautifully. While the oven warms up, grab three 9-inch round cake pans. Grease them with butter or cooking spray, then dust with flour. This will help the cakes release easily once baked. Trust me, there’s nothing worse than a cake that sticks! With your pans ready, you’re one step closer to that Mile-High Black Forest Cake.
Step 2: Mix Dry Ingredients
In a large mixing bowl, combine the all-purpose flour, granulated sugar, unsweetened cocoa powder, baking powder, baking soda, and salt. Whisk them together until they’re well blended. This is where the magic begins! The dry ingredients create the foundation of your cake, so make sure they’re evenly mixed. The cocoa powder will give your cake that rich, chocolatey flavor we all crave. Once combined, you’re ready to add the wet ingredients!
Step 3: Add Wet Ingredients
Now it’s time to incorporate the wet ingredients. Add the large eggs, whole milk, vegetable oil, and vanilla extract to your dry mix. Using a hand mixer or a whisk, blend everything together until it’s smooth and creamy. Don’t worry if the batter seems a bit thick; that’s perfectly normal! The combination of these ingredients will create a luscious batter that’s bursting with flavor. Get ready for the next step—this cake is coming together beautifully!
Step 4: Combine and Bake
Here comes the fun part! Carefully stir in the boiling water to your batter. This step may seem unusual, but it helps to bloom the cocoa, enhancing the chocolate flavor. The batter will be quite thin, but that’s exactly what you want. Pour the batter evenly into your prepared cake pans. Bake in the preheated oven for 30-35 minutes. Keep an eye on them! A toothpick inserted in the center should come out clean when they’re done. Your kitchen will smell heavenly!
Step 5: Cool and Slice
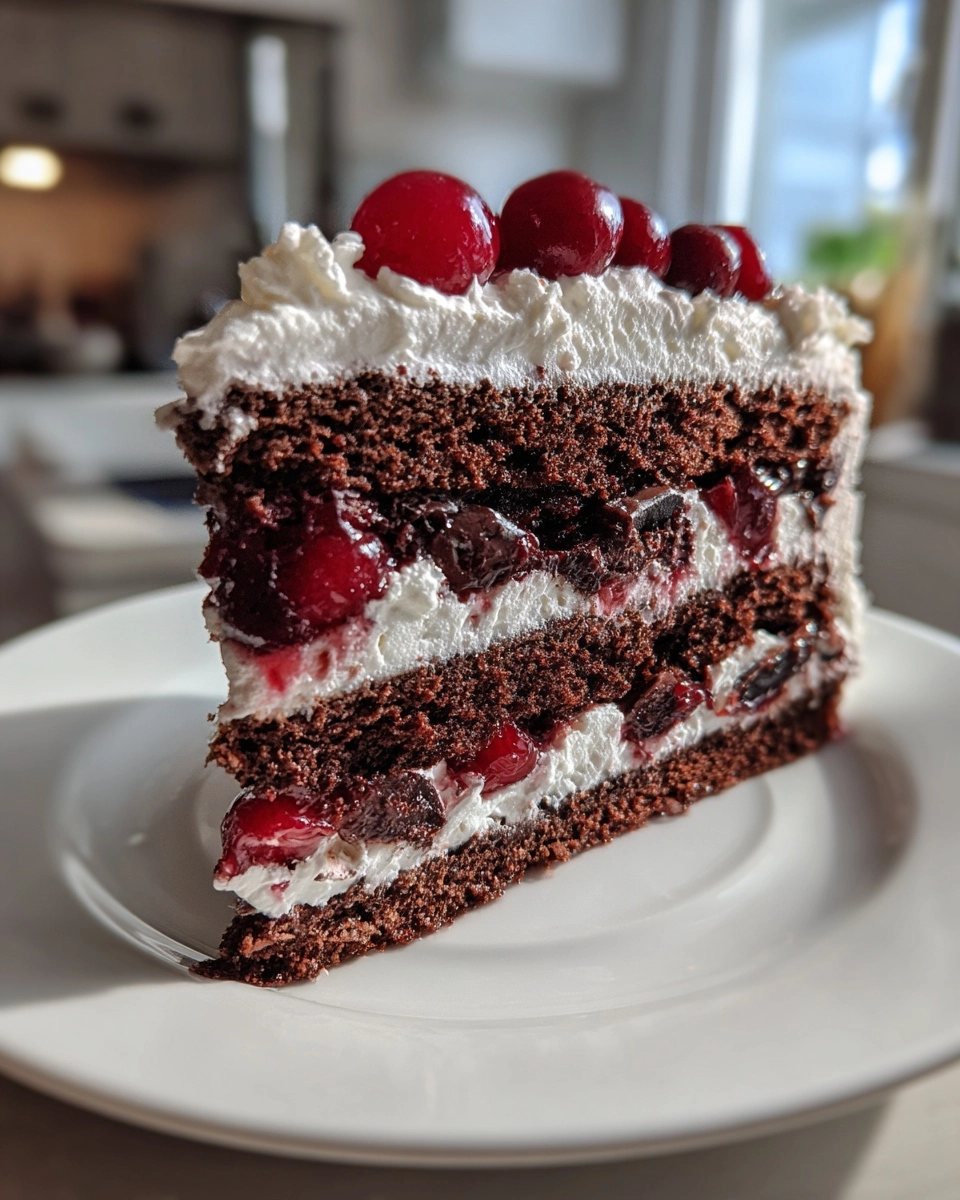
Once baked, remove the cakes from the oven and let them cool in the pans for about 10 minutes. This allows them to set before transferring. Carefully turn them out onto wire racks to cool completely. Patience is key here! Once cooled, slice each cake in half horizontally. This will create layers for your Mile-High Black Forest Cake. The more layers, the more deliciousness! You’re almost there!
Step 6: Whip Cream and Layer
Now, let’s whip up that luscious cream! In a mixing bowl, pour in the heavy whipping cream and add the powdered sugar. Using a hand mixer, whip until stiff peaks form. This fluffy cream will be the perfect complement to your chocolate layers. Start layering your cake by placing one layer on a serving plate. Spread a generous amount of whipped cream and add a layer of Morello cherries. Repeat this process with the remaining layers. It’s a beautiful sight!
Step 7: Frost and Garnish
Finally, it’s time to frost your Mile-High Black Forest Cake! Use the remaining whipped cream to frost the top and sides of the cake. Don’t be shy—make it as fluffy as you like! For the finishing touch, sprinkle chocolate shavings on top. This adds a touch of elegance and extra chocolatey goodness. Step back and admire your creation. You’ve just made a stunning dessert that’s sure to impress!
Tips for Success
- Make sure all ingredients are at room temperature for better mixing.
- Use a kitchen scale for precise measurements, especially for flour.
- Don’t skip the cooling step; it prevents melting the whipped cream.
- For a fun twist, add a splash of cherry liqueur between layers.
- Store leftovers in the fridge, but enjoy within a few days for best taste.
Equipment Needed
- Three 9-inch round cake pans (or two pans if you prefer fewer layers)
- Mixing bowls (a large one for dry ingredients and a medium one for wet)
- Hand mixer or whisk (a stand mixer works too)
- Measuring cups and spoons for accuracy
- Wire racks for cooling the cakes
Variations
- Gluten-Free Option: Substitute all-purpose flour with a gluten-free flour blend for a delicious gluten-free Mile-High Black Forest Cake.
- Vegan Twist: Replace eggs with flaxseed meal and use almond milk instead of whole milk. Opt for a plant-based whipped cream for a vegan-friendly version.
- Cherry Alternatives: If Morello cherries aren’t available, try using fresh raspberries or strawberries for a fruity twist.
- Chocolate Lovers: Add chocolate chips to the batter for an extra chocolatey experience that will delight any chocoholic.
- Layered Flavors: Incorporate a layer of chocolate ganache between the cake layers for an indulgent surprise.
Serving Suggestions
- Pair your Mile-High Black Forest Cake with a scoop of vanilla ice cream for a delightful contrast.
- Serve with a dollop of extra whipped cream on the side for those who crave more.
- A cup of freshly brewed coffee or a glass of dessert wine complements the rich flavors beautifully.
- For presentation, garnish each slice with a cherry on top and a sprinkle of chocolate shavings.
FAQs about Mile-High Black Forest Cake
Can I make Mile-High Black Forest Cake ahead of time?
Absolutely! This cake can be made a day in advance. Just store it in the refrigerator to keep it fresh. The flavors will meld beautifully overnight, making it even more delicious!
What can I use instead of Morello cherries?
If Morello cherries aren’t available, fresh raspberries or strawberries work wonderfully. They’ll add a lovely fruity twist to your cake while still keeping that delightful flavor profile.
How do I store leftovers?
To keep your Mile-High Black Forest Cake fresh, store it in an airtight container in the refrigerator. Enjoy it within a few days for the best taste and texture!
Can I freeze this cake?
Yes, you can freeze the cake! Just wrap it tightly in plastic wrap and then in aluminum foil. When you’re ready to enjoy it, let it thaw in the fridge overnight before serving.
What’s the best way to serve this cake?
For a stunning presentation, serve each slice with a dollop of whipped cream and a cherry on top. A sprinkle of chocolate shavings adds an elegant touch that will wow your guests!
Summarizing the Joy of Making Mile-High Black Forest Cake
Creating a Mile-High Black Forest Cake is more than just baking; it’s about crafting memories. The process brings joy, from mixing the rich batter to layering it with cherries and whipped cream. Each slice is a celebration, perfect for birthdays, anniversaries, or just because. As you watch your loved ones savor each bite, you’ll feel a sense of accomplishment and happiness. This cake isn’t just a dessert; it’s a heartfelt gesture that shows you care. So, roll up your sleeves, embrace the mess, and enjoy the sweet rewards of your culinary adventure!
PrintMile-High Black Forest Cake: Indulge in Decadent Bliss!

A rich and indulgent chocolate cake layered with cherries and whipped cream, perfect for special occasions.
- Prep Time: 30 minutes
- Cook Time: 35 minutes
- Total Time: 1 hour 5 minutes
- Yield: 12 servings
- Category: Dessert
- Method: Baking
- Cuisine: German
- Diet: Vegetarian
Ingredients
- 2 cups all-purpose flour
- 2 cups granulated sugar
- 3/4 cup unsweetened cocoa powder
- 1 1/2 teaspoons baking powder
- 1 1/2 teaspoons baking soda
- 1 teaspoon salt
- 2 large eggs
- 1 cup whole milk
- 1/2 cup vegetable oil
- 2 teaspoons vanilla extract
- 1 cup boiling water
- 1 jar (24 oz) Morello cherries, drained
- 2 cups heavy whipping cream
- 1/4 cup powdered sugar
- Chocolate shavings for garnish
Instructions
- Preheat the oven to 350°F (175°C). Grease and flour three 9-inch round cake pans.
- In a large bowl, combine flour, sugar, cocoa powder, baking powder, baking soda, and salt.
- Add eggs, milk, oil, and vanilla to the dry ingredients and mix until well combined.
- Stir in boiling water until the batter is smooth.
- Divide the batter evenly among the prepared pans.
- Bake for 30-35 minutes or until a toothpick inserted in the center comes out clean.
- Let the cakes cool in the pans for 10 minutes, then remove from pans and cool completely on wire racks.
- Once cooled, slice each cake in half horizontally to create layers.
- Whip the heavy cream with powdered sugar until stiff peaks form.
- Layer the cakes with whipped cream and cherries in between each layer.
- Frost the top and sides of the cake with remaining whipped cream and garnish with chocolate shavings.
Notes
- For a more intense chocolate flavor, use dark cocoa powder.
- Ensure the cakes are completely cooled before frosting to prevent melting.
- This cake can be made a day in advance and stored in the refrigerator.