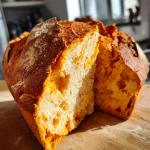
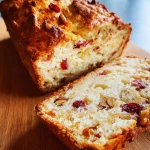
No-Knead Cranberry Nut Bread
As a busy mom, I know how precious time can be, especially when it comes to cooking. That’s why I’m excited to share my No-Knead Cranberry Nut Bread recipe with you! This delightful bread is not only simple to make, but it also fills your kitchen with a warm, inviting aroma that will make your family feel right at home. Whether you’re looking for a quick solution for breakfast or a dish to impress your loved ones at brunch, this bread is the perfect choice. Trust me, once you try it, you’ll be hooked!
Why You’ll Love This No-Knead Cranberry Nut Bread
This No-Knead Cranberry Nut Bread is a game-changer for busy lives. It requires minimal effort, allowing you to spend more time with your loved ones. The sweet-tart cranberries and crunchy nuts create a delightful flavor that dances on your palate. Plus, the best part? You can prepare it the night before and wake up to freshly baked bread, making mornings feel a little more special.
Ingredients for No-Knead Cranberry Nut Bread
Gathering the right ingredients is the first step to creating your No-Knead Cranberry Nut Bread masterpiece. Here’s what you’ll need:
- All-purpose flour: The backbone of your bread, providing structure and a soft texture.
- Dried cranberries: These little gems add a burst of sweetness and a lovely tartness that balances the flavors.
- Chopped nuts: Walnuts or pecans bring a delightful crunch and nutty flavor. Feel free to mix it up!
- Salt: A crucial ingredient that enhances all the other flavors in your bread.
- Baking powder: This helps the bread rise, giving it that fluffy texture we all love.
- Baking soda: Works alongside baking powder to ensure your bread is light and airy.
- Warm water: Activates the yeast and helps bring the dough together. Make sure it’s not too hot!
- Honey (optional): A touch of sweetness that can elevate your bread. You can adjust the amount to your taste.
For exact measurements, check the bottom of the article where you can find everything listed for easy printing. Remember, you can always substitute other dried fruits or nuts based on what you have on hand. This recipe is all about flexibility and making it your own!
How to Make No-Knead Cranberry Nut Bread
Now that you have your ingredients ready, let’s dive into the fun part—making your No-Knead Cranberry Nut Bread! This process is straightforward and requires minimal hands-on time. Just follow these simple steps, and you’ll be on your way to enjoying a delicious loaf.
Step 1: Mix Dry Ingredients
Start by grabbing a large bowl. In it, combine the all-purpose flour, salt, baking powder, and baking soda. Whisk them together until they’re well blended. This step is crucial as it ensures even distribution of the leavening agents, which helps your bread rise beautifully.
Step 2: Add Cranberries and Nuts
Next, toss in the dried cranberries and chopped nuts. Give everything a gentle stir to coat the fruits and nuts with the flour mixture. This little trick prevents them from sinking to the bottom of the loaf while baking. Trust me, you want those delightful bites throughout!
Step 3: Combine Wet Ingredients
In a separate bowl, mix the warm water and honey, if you’re using it. Stir until the honey dissolves completely. The warmth of the water helps activate the ingredients, making your bread rise better. It’s like giving your dough a cozy hug!
Step 4: Mix the Dough
Pour the wet mixture into the dry ingredients. Using a wooden spoon or spatula, stir until just combined. Don’t worry about over-mixing; the dough will be sticky and shaggy, which is exactly what you want. This no-knead method is all about simplicity!
Step 5: Let It Rest
Cover the bowl with plastic wrap and let it rest at room temperature for 12 to 18 hours. Yes, you read that right! This long resting period allows the flavors to develop and the dough to rise. It’s like a little magic happening in your kitchen while you sleep!
Step 6: Preheat the Oven
When you’re ready to bake, preheat your oven to 450°F (230°C). Place a Dutch oven inside to heat up. This step is essential for creating that crispy crust we all love. Just be careful when handling the hot pot; it’s like a treasure chest waiting to reveal your delicious bread!
Step 7: Bake the Bread
Once the oven is hot, carefully remove the Dutch oven. Place your dough inside, shaping it if you like. Cover it with the lid and bake for 30 minutes. After that, remove the lid and bake for an additional 15 minutes until it’s golden brown. The aroma will fill your home, making it hard to resist!
Step 8: Cool and Slice
After baking, let the bread cool on a wire rack for at least 30 minutes. This cooling time is crucial; it allows the bread to set properly. Once cooled, slice it up and enjoy! Whether you slather it with butter or eat it plain, each bite will be a delightful experience.
Tips for Success
- Use fresh ingredients for the best flavor and texture.
- Don’t skip the resting time; it’s key for flavor development.
- Experiment with different nuts or dried fruits to customize your bread.
- Keep your Dutch oven preheated for a perfect crust.
- Let the bread cool completely before slicing for cleaner cuts.
Equipment Needed
- Large mixing bowl: A sturdy bowl for combining ingredients. A glass or ceramic bowl works well.
- Wooden spoon or spatula: Perfect for mixing the dough. A sturdy fork can also do the trick!
- Plastic wrap: To cover the bowl while the dough rests. A clean kitchen towel is a good alternative.
- Dutch oven: Essential for baking. If you don’t have one, a heavy oven-safe pot with a lid will work.
- Wire rack: For cooling the bread. A plate can serve in a pinch!
Variations of No-Knead Cranberry Nut Bread
- Orange Zest: Add a tablespoon of fresh orange zest for a citrusy twist that brightens the flavors.
- Chocolate Chips: Mix in some dark chocolate chips for a sweet surprise that pairs beautifully with cranberries.
- Gluten-Free Option: Substitute all-purpose flour with a gluten-free flour blend for a delicious gluten-free version.
- Spices: Incorporate cinnamon or nutmeg for a warm, cozy flavor that’s perfect for fall.
- Seeds: Add sunflower or pumpkin seeds for extra crunch and nutrition.
- Maple Syrup: Swap honey for maple syrup to give your bread a unique, earthy sweetness.
Serving Suggestions for No-Knead Cranberry Nut Bread
- Serve warm with a pat of butter or cream cheese for a delightful breakfast treat.
- Pair with a steaming cup of coffee or herbal tea for a cozy afternoon snack.
- Slice and toast for a crunchy texture, perfect for topping with jam.
- Present on a rustic wooden board for a charming brunch display.
FAQs about No-Knead Cranberry Nut Bread
Can I use fresh cranberries instead of dried?
While fresh cranberries can be used, they are much more tart. You might want to add a bit more sweetness to balance the flavors. Dried cranberries are perfect for this No-Knead Cranberry Nut Bread because they add a lovely sweetness and chewiness.
How do I store leftover bread?
To keep your No-Knead Cranberry Nut Bread fresh, store it in an airtight container at room temperature. It should last up to a week. If you want to keep it longer, slice it and freeze the pieces. Just pop them in the toaster when you’re ready to enjoy!
Can I make this bread ahead of time?
Absolutely! The beauty of this No-Knead Cranberry Nut Bread is that you can prepare the dough the night before. Just let it rest overnight, and bake it in the morning for a fresh loaf that will impress your family.
What can I serve with this bread?
This bread pairs wonderfully with butter, cream cheese, or even a dollop of jam. It’s also delicious alongside a warm bowl of soup or salad for a complete meal. The possibilities are endless!
Can I substitute the nuts in the recipe?
Yes! Feel free to swap walnuts or pecans for your favorite nuts. Almonds, hazelnuts, or even seeds can add a unique twist to your No-Knead Cranberry Nut Bread. Just make sure to chop them up for even distribution!
Summarizing the Joy of No-Knead Cranberry Nut Bread
There’s something truly magical about baking your own bread, especially when it’s as easy as this No-Knead Cranberry Nut Bread. The joy of pulling a warm, golden loaf from the oven fills your home with love and comfort. Each slice is a delightful blend of sweet cranberries and crunchy nuts, perfect for any occasion. Whether you’re sharing it with family at breakfast or enjoying a quiet moment with a cup of tea, this bread brings people together. It’s not just a recipe; it’s a heartfelt experience that transforms ordinary days into cherished memories.
PrintNo-Knead Cranberry Nut Bread: Easy Recipe for All!
A simple and delicious no-knead bread recipe featuring cranberries and nuts, perfect for any occasion.
- Prep Time: 15 minutes
- Cook Time: 45 minutes
- Total Time: 12-18 hours (including resting time)
- Yield: 1 loaf
- Category: Bread
- Method: Baking
- Cuisine: American
- Diet: Vegetarian
Ingredients
- 3 cups all-purpose flour
- 1 cup dried cranberries
- 1 cup chopped nuts (walnuts or pecans)
- 1 1/2 teaspoons salt
- 1 teaspoon baking powder
- 1/2 teaspoon baking soda
- 1 1/4 cups warm water
- 1 tablespoon honey (optional)
Instructions
- In a large bowl, mix together the flour, salt, baking powder, and baking soda.
- Add the dried cranberries and chopped nuts to the dry ingredients.
- In a separate bowl, combine the warm water and honey, then pour it into the dry mixture.
- Stir until just combined; the dough will be sticky.
- Cover the bowl with plastic wrap and let it rest at room temperature for 12 to 18 hours.
- After resting, preheat the oven to 450°F (230°C) and place a Dutch oven inside to heat up.
- Once heated, carefully remove the Dutch oven, and place the dough inside (you can shape it if desired).
- Cover and bake for 30 minutes, then remove the lid and bake for an additional 15 minutes until golden brown.
- Let the bread cool on a wire rack before slicing.
Notes
- For a sweeter bread, add more honey or sugar.
- Feel free to substitute other dried fruits or nuts based on your preference.
- This bread can be stored in an airtight container for up to a week.