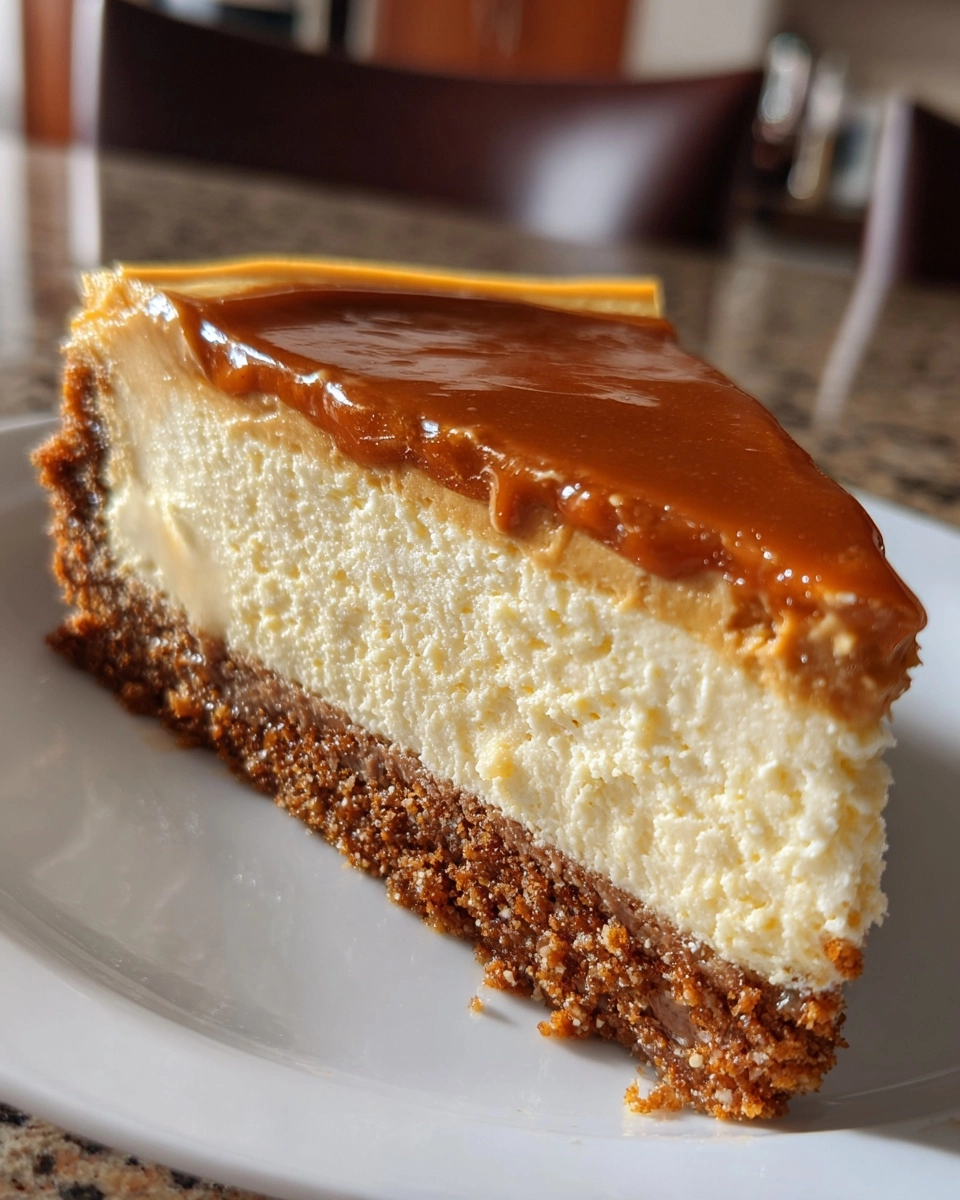
Keto Peanut Butter Cheesecake Recipe: Creamy, Dreamy, And Ready In Minutes
Hey there, fellow food lovers! If you’re like me, juggling a busy life while trying to whip up something delicious can feel like a high-wire act. That’s why I’m excited to share my Keto Peanut Butter Cheesecake Recipe with you. It’s creamy, dreamy, and ready in minutes! This dessert is not just a quick solution for a hectic day; it’s also a delightful way to satisfy your sweet tooth without the guilt. Trust me, your loved ones will be begging for seconds, and you’ll feel like a culinary rockstar!
Why You’ll Love This Keto Peanut Butter Cheesecake Recipe
This Keto Peanut Butter Cheesecake Recipe is a game-changer for busy moms and professionals alike. It’s incredibly easy to make, taking just a few minutes of prep time. Plus, the rich, creamy texture and delightful peanut butter flavor will have your taste buds dancing with joy. You can indulge without the guilt, making it the perfect low-carb dessert for any occasion. Trust me, you’ll want to keep this recipe on repeat!
Ingredients for Keto Peanut Butter Cheesecake Recipe
Let’s dive into the deliciousness! Here’s what you’ll need for this scrumptious keto cheesecake recipe:
- Almond flour: A fantastic low-carb alternative to regular flour, giving the crust a nutty flavor.
- Unsweetened cocoa powder: Adds a rich chocolatey taste without the sugar, perfect for chocolate lovers.
- Erythritol or preferred sweetener: A sugar substitute that keeps the dessert sweet while keeping carbs low.
- Unsalted butter: This adds richness to the crust, making it buttery and delicious.
- Cream cheese: The star of the show! It creates that creamy texture we all crave in cheesecake.
- Sour cream: Adds a tangy flavor and helps achieve that smooth consistency.
- Peanut butter: The flavor hero! It brings a nutty richness that pairs perfectly with the cream cheese.
- Eggs: These help bind everything together, giving the cheesecake its structure.
- Vanilla extract: A splash of this adds warmth and depth to the overall flavor.
For those who want to get creative, consider using natural peanut butter without added sugar for a richer taste. You can also top your cheesecake with sugar-free chocolate sauce or whipped cream for an extra treat!
Don’t forget, the exact quantities of these ingredients are listed at the bottom of the article for easy printing. Happy baking!
How to Make Keto Peanut Butter Cheesecake Recipe
Now, let’s get to the fun part—making this delicious keto cheesecake recipe! Follow these simple steps, and you’ll have a creamy dessert that’s sure to impress.
Step 1: Preheat the Oven
First things first, preheat your oven to 325°F (160°C). Preheating is crucial because it ensures even baking. You want that cheesecake to cook perfectly, not too soft or too firm. Trust me, your patience will pay off!
Step 2: Prepare the Crust
In a mixing bowl, combine the almond flour, cocoa powder, and erythritol. Stir them together until they’re well mixed. Then, pour in the melted butter. This is where the magic happens! Mix until the texture resembles wet sand. It should hold together when you squeeze it in your hand.
Step 3: Form the Crust
Now, take that crumbly mixture and press it firmly into the bottom of a springform pan. Make sure it’s even and compact. This solid base is essential for holding all that creamy goodness on top. Use the back of a measuring cup or your fingers to get it just right!
Step 4: Make the Filling
In another bowl, beat the softened cream cheese until it’s smooth and creamy. This step is key for a luscious texture. Next, add the sour cream, peanut butter, eggs, and vanilla extract. Mix until everything is well combined and silky. You want a filling that’s as dreamy as it sounds!
Step 5: Combine and Pour
Carefully pour the cheesecake filling over the crust in the springform pan. Use a spatula to spread it evenly. This ensures every bite is packed with that rich peanut butter flavor. It’s like a warm hug in dessert form!
Step 6: Bake the Cheesecake
Pop the cheesecake into the preheated oven and bake for 30-35 minutes. Keep an eye on it! The center should be set but still slightly jiggly. This means it’s perfectly baked. Overbaking can lead to a dry cheesecake, and we don’t want that!
Step 7: Cool and Refrigerate
Once baked, let the cheesecake cool at room temperature for about 30 minutes. Then, refrigerate it for at least 2 hours before serving. Chilling allows the flavors to meld beautifully and gives you that perfect slice. Patience is a virtue, especially when it comes to cheesecake!
Tips for Success
- Make sure your cream cheese is at room temperature for easy mixing.
- Use a springform pan for easy removal and presentation.
- Don’t skip the chilling time; it enhances the flavor and texture.
- For a smoother filling, blend the ingredients until fully combined.
- Experiment with toppings like fresh berries or a drizzle of sugar-free chocolate.
Equipment Needed
- Springform pan: Ideal for easy removal; a regular pie dish works too.
- Mixing bowls: Use any size; just ensure they’re large enough for mixing.
- Electric mixer: A hand mixer is great; a whisk can work if you’re up for a workout!
- Spatula: Perfect for spreading the filling; a wooden spoon can do the job too.
Variations
- Chocolate Swirl: Add a swirl of melted sugar-free chocolate into the filling before baking for a decadent twist.
- Nutty Crunch: Mix in chopped nuts like pecans or walnuts into the crust for added texture and flavor.
- Berry Bliss: Top your cheesecake with fresh berries like strawberries or raspberries for a fruity contrast.
- Spiced Delight: Add a pinch of cinnamon or nutmeg to the filling for a warm, spiced flavor.
- Vegan Option: Substitute cream cheese with a vegan cream cheese alternative and use flax eggs for a plant-based version.
Serving Suggestions
- Pair your cheesecake with a dollop of whipped cream for extra creaminess.
- Serve alongside fresh berries for a pop of color and flavor.
- Drizzle with sugar-free chocolate sauce for a decadent touch.
- Enjoy with a cup of coffee or herbal tea for a delightful afternoon treat.
- Garnish with crushed nuts for added crunch and visual appeal.
FAQs about Keto Peanut Butter Cheesecake Recipe
Can I use a different sweetener in this keto cheesecake recipe?
Absolutely! You can substitute erythritol with other low-carb sweeteners like stevia or monk fruit. Just be sure to adjust the quantity according to the sweetness level of your chosen sweetener.
How do I store leftovers of the keto cheesecake?
Store any leftovers in an airtight container in the refrigerator. It will stay fresh for up to 5 days. Just remember to let it sit at room temperature for a few minutes before serving for the best texture!
Can I freeze the keto peanut butter cheesecake?
Yes, you can freeze it! Wrap individual slices tightly in plastic wrap and then place them in a freezer-safe container. They can last up to 2 months in the freezer. Just thaw in the fridge before enjoying!
What can I use instead of cream cheese for a dairy-free option?
If you’re looking for a dairy-free alternative, try using a vegan cream cheese substitute. It works well in this keto cheesecake recipe and keeps the creamy texture intact.
Is this cheesecake suitable for a low-carb diet?
Yes! This keto peanut butter cheesecake recipe is perfect for a low-carb diet. With only 6g of carbohydrates per slice, you can indulge without straying from your dietary goals.
Summarizing the Joy of Keto Peanut Butter Cheesecake Recipe
There’s something truly magical about this Keto Peanut Butter Cheesecake Recipe. It’s not just a dessert; it’s a celebration of flavors that brings joy to any occasion. The creamy texture and rich peanut butter taste create a delightful experience that feels indulgent yet guilt-free.
Whether you’re sharing it with family or savoring a slice after a long day, this cheesecake is sure to bring smiles all around. Plus, knowing it’s low-carb makes it even sweeter! So, roll up your sleeves and treat yourself to this creamy delight—you deserve it!
PrintKeto cheesecake recipe: Indulge in creamy delight today!
A delicious and creamy keto cheesecake recipe that is quick to prepare and perfect for satisfying your sweet tooth while staying low-carb.
- Prep Time: 10 minutes
- Cook Time: 35 minutes
- Total Time: 2 hours 45 minutes
- Yield: 8 servings
- Category: Dessert
- Method: Baking
- Cuisine: American
- Diet: Keto
Ingredients
- 1 cup almond flour
- 1/4 cup unsweetened cocoa powder
- 1/2 cup erythritol or preferred sweetener
- 1/2 cup unsalted butter, melted
- 16 oz cream cheese, softened
- 1/2 cup sour cream
- 1/4 cup peanut butter
- 3 large eggs
- 1 tsp vanilla extract
Instructions
- Preheat the oven to 325°F (160°C).
- In a mixing bowl, combine almond flour, cocoa powder, and erythritol.
- Add melted butter to the dry ingredients and mix until crumbly.
- Press the mixture into the bottom of a springform pan to form the crust.
- In another bowl, beat the cream cheese until smooth.
- Add sour cream, peanut butter, eggs, and vanilla extract to the cream cheese and mix until well combined.
- Pour the cheesecake filling over the crust in the springform pan.
- Bake for 30-35 minutes or until the center is set.
- Let it cool, then refrigerate for at least 2 hours before serving.
Notes
- For a richer flavor, use natural peanut butter without added sugar.
- Top with sugar-free chocolate sauce or whipped cream if desired.
- Store leftovers in the refrigerator for up to 5 days.


