High Altitude Vanilla Cupcakes
As a busy mom, I know how precious time can be, especially when it comes to baking. That’s why I’m excited to share my recipe for High Altitude Vanilla Cupcakes. These delightful treats are not only easy to whip up, but they also deliver a perfect texture and flavor, even at higher elevations. Whether you’re looking to impress your loved ones or simply want a quick solution for a sweet craving, these cupcakes are your answer. Trust me, once you try them, you’ll be reaching for this recipe again and again!
Why You’ll Love This High Altitude Vanilla Cupcakes
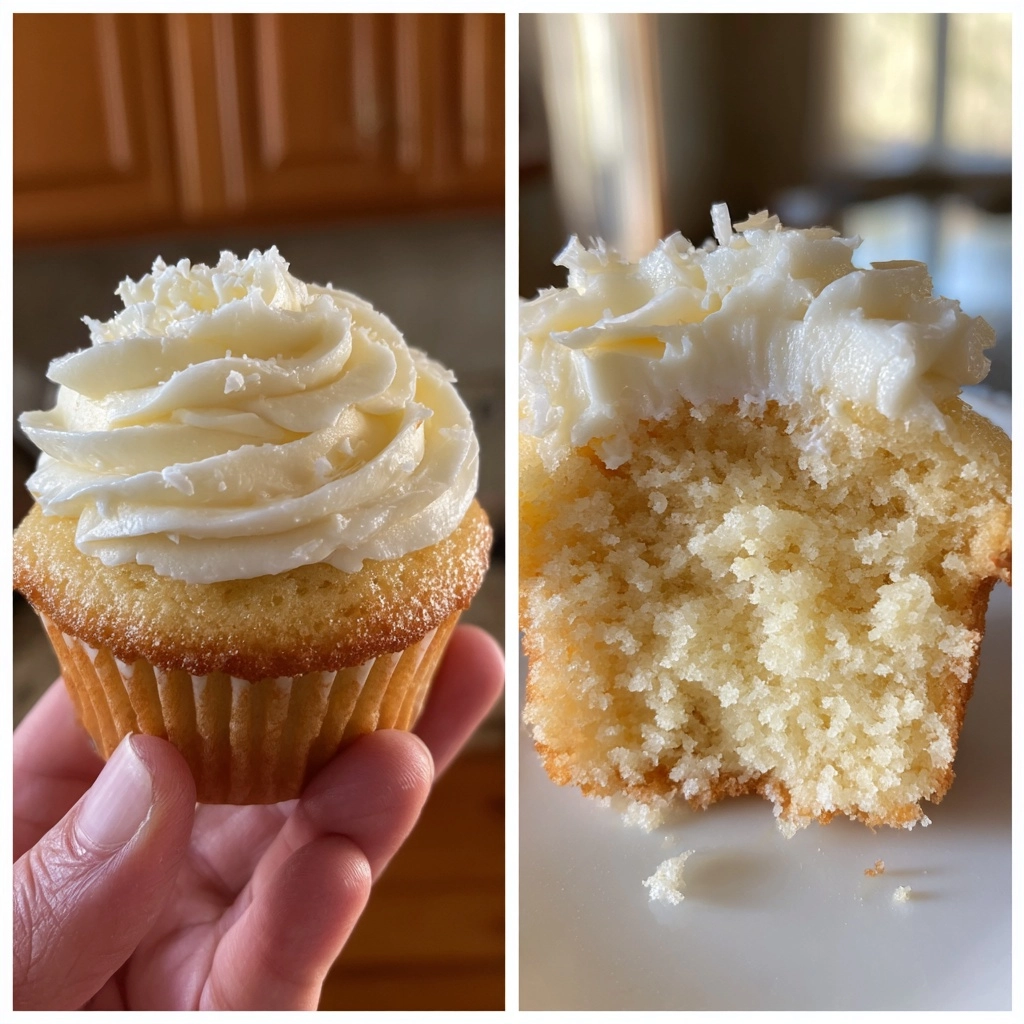
These High Altitude Vanilla Cupcakes are a game-changer for busy lives. They come together in just 35 minutes, making them perfect for last-minute gatherings or a sweet treat after dinner. The flavor is rich and buttery, while the texture is light and fluffy—just what you want in a cupcake! Plus, they’re versatile enough to dress up for special occasions or enjoy simply with a cup of coffee.
Ingredients for High Altitude Vanilla Cupcakes
Gathering the right ingredients is key to baking success, especially when it comes to High Altitude Vanilla Cupcakes. Here’s what you’ll need:
- All-purpose flour: This is the backbone of your cupcakes, providing structure. For a lighter texture, consider using cake flour instead.
- Granulated sugar: Sweetness is essential! It not only adds flavor but also helps with the cupcake’s moisture.
- Unsalted butter: Softened butter creates a rich flavor and tender crumb. If you’re in a pinch, you can substitute with vegetable oil.
- Large eggs: Eggs bind the ingredients together and add moisture. Room temperature eggs work best for a smooth batter.
- Milk: This adds moisture and richness. You can use whole milk or even almond milk for a dairy-free option.
- Vanilla extract: Pure vanilla extract enhances the flavor. If you’re feeling adventurous, try using almond extract for a twist!
- Baking powder: This leavening agent helps your cupcakes rise. Make sure it’s fresh for the best results.
- Salt: Just a pinch balances the sweetness and enhances the overall flavor.
For exact measurements, check the bottom of the article where you can find everything listed for easy printing. Happy baking!
How to Make High Altitude Vanilla Cupcakes
Now that you have your ingredients ready, let’s dive into the fun part—making these High Altitude Vanilla Cupcakes! Follow these simple steps, and you’ll be on your way to baking success.
Step 1: Preheat the Oven
First things first, preheat your oven to 350°F (175°C). Preheating is crucial, especially at high altitudes, as it helps your cupcakes rise properly. A hot oven ensures that the batter starts cooking immediately, creating that lovely fluffy texture we all crave.
Step 2: Cream Butter and Sugar
In a mixing bowl, cream together the softened butter and granulated sugar until the mixture is light and fluffy. This step is vital because it incorporates air into the batter, giving your cupcakes a tender crumb. Aim for a pale yellow color, which usually takes about 3-5 minutes of mixing.
Step 3: Add Eggs and Vanilla
Next, add the eggs one at a time, mixing well after each addition. Eggs are the glue that holds everything together, adding moisture and structure. Don’t forget to stir in the vanilla extract, which brings a warm, inviting flavor to your cupcakes. Trust me, it makes a world of difference!
Step 4: Combine Dry Ingredients
In a separate bowl, whisk together the all-purpose flour, baking powder, and salt. Mixing these dry ingredients separately ensures that the baking powder is evenly distributed. This step is especially important for high altitude baking, as it helps your cupcakes rise uniformly.
Step 5: Mix Wet and Dry Ingredients
Now, it’s time to combine the wet and dry ingredients. Gradually add the dry mixture to the wet ingredients, alternating with the milk. Mix until just combined—overmixing can lead to dense cupcakes. You want to see a few lumps; that’s perfectly fine!
Step 6: Fill Cupcake Liners
Line your cupcake pan with liners and fill them about two-thirds full with batter. This allows room for the cupcakes to rise without overflowing. If you fill them too much, you’ll end up with a messy oven and flat cupcakes!
Step 7: Bake to Perfection
Place your filled cupcake pan in the preheated oven and bake for 18-20 minutes. To check for doneness, insert a toothpick into the center of a cupcake. If it comes out clean or with a few crumbs, they’re ready! Keep an eye on them, as baking times can vary based on your oven.
Step 8: Cool and Frost
Once baked, allow the cupcakes to cool in the pan for about 5 minutes before transferring them to a wire rack. Cooling is essential before frosting; otherwise, your frosting will melt into a puddle. Once cooled, feel free to frost with your favorite icing—cream cheese, buttercream, or even a simple dusting of powdered sugar!
Tips for Success
- Always use room temperature ingredients for a smoother batter.
- Check your baking powder’s freshness; it should be active for the best rise.
- Don’t overmix the batter; a few lumps are okay!
- Rotate your cupcake pan halfway through baking for even cooking.
- Experiment with different frostings to find your favorite flavor combination.
Equipment Needed
- Mixing bowls: A set of various sizes is handy. You can also use a large pot if needed.
- Electric mixer: A stand mixer or hand mixer works best, but a whisk can do in a pinch.
- Measuring cups and spoons: Essential for accuracy; consider using a kitchen scale for precision.
- Cupcake pan: A standard 12-cup pan is perfect. Silicone pans are a great non-stick alternative.
- Cooling rack: Helps cool cupcakes evenly; a plate can work if you don’t have one.
Variations of High Altitude Vanilla Cupcakes
- Chocolate Chip: Fold in mini chocolate chips for a delightful surprise in every bite.
- Coconut: Add shredded coconut to the batter for a tropical twist that pairs beautifully with vanilla.
- Lemon Zest: Incorporate lemon zest for a refreshing citrus flavor that brightens up the cupcakes.
- Gluten-Free: Substitute all-purpose flour with a gluten-free blend for a delicious gluten-free option.
- Dairy-Free: Use coconut milk and dairy-free butter to make these cupcakes suitable for a dairy-free diet.
- Nutty Flavor: Add finely chopped nuts like walnuts or pecans for a crunchy texture and nutty flavor.
- Spiced Cupcakes: Mix in a teaspoon of cinnamon or nutmeg for a warm, spiced flavor that’s perfect for fall.
Serving Suggestions
- Pair your High Altitude Vanilla Cupcakes with a scoop of vanilla ice cream for a delightful dessert.
- Serve with a side of fresh berries to add a pop of color and freshness.
- For a fun presentation, dust with powdered sugar or drizzle with chocolate sauce.
- Enjoy with a cup of coffee or tea for a cozy afternoon treat.
FAQs about High Altitude Vanilla Cupcakes
Can I use this recipe at sea level?
While this recipe is tailored for high altitude, you can still use it at sea level. Just keep an eye on the baking time, as it may vary. You might also want to reduce the baking powder slightly for a better rise.
What adjustments should I make for higher altitudes?
If you’re baking at elevations above 5,000 feet, consider increasing the oven temperature by 25°F and reducing the sugar by a couple of tablespoons. This helps counteract the lower air pressure that affects baking.
How can I store leftover cupcakes?
Store your High Altitude Vanilla Cupcakes in an airtight container at room temperature for up to three days. If you want to keep them longer, freeze them without frosting for up to three months.
Can I make these cupcakes ahead of time?
Absolutely! You can bake the cupcakes a day in advance. Just make sure to cool them completely before storing. Frost them on the day you plan to serve for the best flavor and texture.
What frosting pairs best with these cupcakes?
These cupcakes are incredibly versatile! A classic buttercream or cream cheese frosting complements the vanilla flavor beautifully. For a lighter option, consider whipped cream or a simple glaze.
Summarizing the Joy of High Altitude Vanilla Cupcakes
Baking High Altitude Vanilla Cupcakes is more than just a recipe; it’s an experience filled with joy and creativity. The aroma of vanilla wafting through your kitchen can instantly lift your spirits. Each fluffy bite is a reminder that even in our busy lives, we can create something special. Whether you’re celebrating a birthday or simply treating yourself, these cupcakes bring smiles to faces young and old. So, roll up your sleeves, gather your loved ones, and enjoy the sweet moments that come from baking together. Trust me, these cupcakes will become a cherished favorite in your home!
PrintHigh Altitude Vanilla Cupcakes: Bake Perfect Treats Today!
Delicious vanilla cupcakes specifically designed for high altitude baking, ensuring perfect texture and flavor.
- Prep Time: 15 minutes
- Cook Time: 20 minutes
- Total Time: 35 minutes
- Yield: 12 cupcakes
- Category: Dessert
- Method: Baking
- Cuisine: American
- Diet: Vegetarian
Ingredients
- 1 1/2 cups all-purpose flour
- 1 cup granulated sugar
- 1/2 cup unsalted butter, softened
- 2 large eggs
- 1/2 cup milk
- 2 teaspoons vanilla extract
- 1 1/2 teaspoons baking powder
- 1/4 teaspoon salt
Instructions
- Preheat your oven to 350°F (175°C).
- In a mixing bowl, cream together the softened butter and sugar until light and fluffy.
- Add the eggs one at a time, mixing well after each addition.
- Stir in the vanilla extract.
- In a separate bowl, whisk together the flour, baking powder, and salt.
- Gradually add the dry ingredients to the wet mixture, alternating with the milk, and mix until just combined.
- Fill cupcake liners about 2/3 full with the batter.
- Bake for 18-20 minutes or until a toothpick inserted in the center comes out clean.
- Allow to cool before frosting.
Notes
- For best results, use room temperature ingredients.
- Adjust baking time as needed based on your oven.
- Consider using a high-altitude baking guide for further adjustments.


