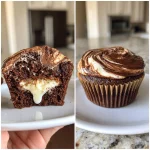
Indulge in Swirled Chocolate Cupcakes with Creamy Filling
There’s something magical about chocolate cupcakes, especially when you can indulge in swirled chocolate cupcakes with creamy filling. These delightful treats are perfect for any occasion, whether it’s a busy weeknight or a special celebration. I know how hectic life can get, and these cupcakes are a quick solution that will impress your loved ones. With their rich chocolate flavor and luscious creamy center, they’re sure to bring smiles all around. So, let’s dive into this delicious adventure together!
Why You’ll Love This Indulge in Swirled Chocolate Cupcakes with Creamy Filling
These cupcakes are not just a treat; they’re a lifesaver for busy moms and professionals like us. They come together quickly, making them perfect for last-minute gatherings or a sweet surprise for your family. The combination of rich chocolate and creamy filling creates a taste sensation that’s hard to resist. Plus, they’re a hit with both kids and adults, ensuring everyone leaves with a smile!
Ingredients Indulge in Swirled Chocolate Cupcakes with Creamy Filling
Gathering the right ingredients is the first step to creating these delightful cupcakes. Here’s what you’ll need:
- All-purpose flour: This is the backbone of your cupcakes, providing structure and texture.
- Granulated sugar: Sweetness is key! It helps balance the rich chocolate flavor.
- Unsweetened cocoa powder: For that deep chocolate taste, this ingredient is a must.
- Baking powder: This leavening agent helps your cupcakes rise and become fluffy.
- Baking soda: Another leavening agent that works with the acidity of buttermilk.
- Salt: Just a pinch enhances all the flavors in your cupcakes.
- Unsalted butter: Adds richness and moisture; make sure it’s softened for easy mixing.
- Large eggs: They bind everything together and add moisture.
- Vanilla extract: A splash of this adds warmth and depth to the flavor.
- Buttermilk: This ingredient keeps the cupcakes moist and tender.
- Cream cheese: The star of the creamy filling, it adds a tangy richness.
- Powdered sugar: Sweetens the cream cheese filling and gives it a smooth texture.
- Heavy cream: This makes the filling extra creamy and luscious.
For those who want to experiment, consider using dark chocolate cocoa powder for a richer flavor. You can also add chocolate chips for an extra texture boost. All ingredient measurements are at the bottom of the article and available for printing, so you can easily whip these up in your kitchen!
How to Make Indulge in Swirled Chocolate Cupcakes with Creamy Filling
Step 1: Preheat the Oven
First things first, preheat your oven to 350°F (175°C). This step is crucial because it ensures your cupcakes bake evenly. While the oven warms up, line your cupcake pan with liners. This makes for easy removal and adds a pop of color to your treats!
Step 2: Mix Dry Ingredients
In a large bowl, combine the all-purpose flour, granulated sugar, unsweetened cocoa powder, baking powder, baking soda, and salt. Whisk them together until they’re well blended. This step is important because it helps distribute the leavening agents evenly, ensuring your cupcakes rise beautifully.
Step 3: Combine Wet Ingredients
Now, it’s time to add the wet ingredients. In the same bowl, add the softened unsalted butter, large eggs, vanilla extract, and buttermilk. Mix everything together until the batter is smooth and creamy. This is where the magic happens, as the butter and eggs create a rich texture that will make your cupcakes irresistible!
Step 4: Fill Cupcake Liners
Using a spoon or a scoop, fill each cupcake liner halfway with the batter. This allows room for the cupcakes to rise without overflowing. Remember, we want those beautiful swirls, so don’t overfill!
Step 5: Prepare the Creamy Filling
In a separate bowl, beat the cream cheese until it’s smooth and creamy. Then, add the powdered sugar and heavy cream. Mix until everything is well combined and fluffy. This creamy filling is the heart of your cupcakes, adding a delightful surprise in every bite!
Step 6: Add Creamy Filling
Now, drop a spoonful of the creamy filling right into the center of each cupcake batter. Don’t worry if it looks a bit messy; that’s part of the charm! Just make sure to cover the filling with a little more batter to keep it hidden.
Step 7: Bake the Cupcakes
Place the cupcake pan in the preheated oven and bake for 18-20 minutes. To check for doneness, insert a toothpick into the center of a cupcake. If it comes out clean, they’re ready! If not, give them a few more minutes.
Step 8: Cool and Serve
Once baked, remove the cupcakes from the oven and let them cool in the pan for about 5 minutes. Then, transfer them to a wire rack to cool completely. This step is essential because serving them warm can make the creamy filling ooze out. Trust me, waiting is worth it!
Tips for Success
- Always use room temperature ingredients for a smoother batter.
- Don’t skip the cooling step; it helps the flavors meld beautifully.
- For even baking, rotate the cupcake pan halfway through the baking time.
- Use a cookie scoop for uniform cupcake sizes.
- Experiment with different fillings like peanut butter or fruit preserves for a fun twist!
Equipment Needed
- Oven: Essential for baking; a toaster oven can work in a pinch.
- Mixing bowls: Use any size; a large bowl is best for mixing.
- Whisk: A hand whisk or electric mixer will do the job.
- Cupcake pan: Standard or silicone pans are great options.
- Measuring cups and spoons: Essential for accuracy; a kitchen scale is a handy alternative.
Variations
- Gluten-Free: Substitute all-purpose flour with a gluten-free blend for a delicious gluten-free option.
- Vegan: Use plant-based butter, flax eggs, and non-dairy milk to create a vegan version of these cupcakes.
- Mint Chocolate: Add a few drops of peppermint extract to the batter for a refreshing minty twist.
- Nutty Delight: Fold in chopped nuts like walnuts or pecans for added crunch and flavor.
- Fruit-Filled: Swap the creamy filling for a fruit preserve or fresh fruit for a lighter option.
Serving Suggestions
- Pair these cupcakes with a scoop of vanilla ice cream for a delightful dessert experience.
- Serve alongside a rich cup of coffee or a refreshing glass of milk.
- For a festive touch, dust with powdered sugar or drizzle with chocolate sauce.
- Arrange on a colorful platter for an eye-catching presentation.
FAQs about Indulge in Swirled Chocolate Cupcakes with Creamy Filling
Can I make these cupcakes ahead of time?
Absolutely! You can bake the cupcakes a day in advance. Just store them in an airtight container at room temperature. The creamy filling will stay delicious, and you can frost them just before serving for that fresh touch.
What can I substitute for buttermilk?
If you don’t have buttermilk on hand, don’t worry! You can make a quick substitute by mixing one cup of milk with a tablespoon of vinegar or lemon juice. Let it sit for about 5 minutes, and you’re good to go!
How do I store leftover cupcakes?
To keep your cupcakes fresh, store them in an airtight container at room temperature for up to three days. If you want to keep them longer, you can freeze them for up to a month. Just thaw them in the fridge before serving!
Can I use a different filling?
Definitely! While the creamy filling is a star, you can experiment with other fillings like peanut butter, Nutella, or even fruit preserves. Each option adds a unique twist to your cupcakes!
What’s the best way to frost these cupcakes?
For a fun presentation, use a piping bag to frost the tops with your favorite chocolate or vanilla frosting. You can also sprinkle some chocolate shavings or colorful sprinkles on top for an extra touch of joy!
Summarizing the Joy of Indulging in Swirled Chocolate Cupcakes with Creamy Filling
Indulging in swirled chocolate cupcakes with creamy filling is more than just a baking experience; it’s a delightful journey that brings joy to your kitchen. The rich chocolate flavor combined with the luscious creamy center creates a moment of bliss in every bite. Whether you’re sharing them with family or enjoying a quiet moment to yourself, these cupcakes are sure to brighten your day. They remind us that even in our busy lives, there’s always time for a little sweetness. So, gather your loved ones and savor the happiness these cupcakes bring!
PrintIndulge in Swirled Chocolate Cupcakes with Creamy Filling Today!
Delicious chocolate cupcakes swirled with creamy filling, perfect for any occasion.
- Prep Time: 20 minutes
- Cook Time: 20 minutes
- Total Time: 40 minutes
- Yield: 12 cupcakes
- Category: Dessert
- Method: Baking
- Cuisine: American
- Diet: Vegetarian
Ingredients
- 1 1/2 cups all-purpose flour
- 1 cup granulated sugar
- 1/2 cup unsweetened cocoa powder
- 1 tsp baking powder
- 1/2 tsp baking soda
- 1/4 tsp salt
- 1/2 cup unsalted butter, softened
- 2 large eggs
- 1 tsp vanilla extract
- 1 cup buttermilk
- 1 cup cream cheese, softened
- 1/2 cup powdered sugar
- 1/4 cup heavy cream
Instructions
- Preheat the oven to 350°F (175°C) and line a cupcake pan with liners.
- In a large bowl, mix together flour, sugar, cocoa powder, baking powder, baking soda, and salt.
- Add the softened butter, eggs, vanilla extract, and buttermilk to the dry ingredients and mix until smooth.
- Fill each cupcake liner halfway with the batter.
- In another bowl, beat the cream cheese until smooth, then add powdered sugar and heavy cream, mixing until creamy.
- Drop a spoonful of the cream cheese mixture into the center of each cupcake batter.
- Top with more cupcake batter to cover the filling.
- Bake for 18-20 minutes or until a toothpick comes out clean.
- Let cool before serving.
Notes
- For a richer flavor, use dark chocolate cocoa powder.
- These cupcakes can be stored in an airtight container for up to 3 days.
- Feel free to add chocolate chips for extra texture.