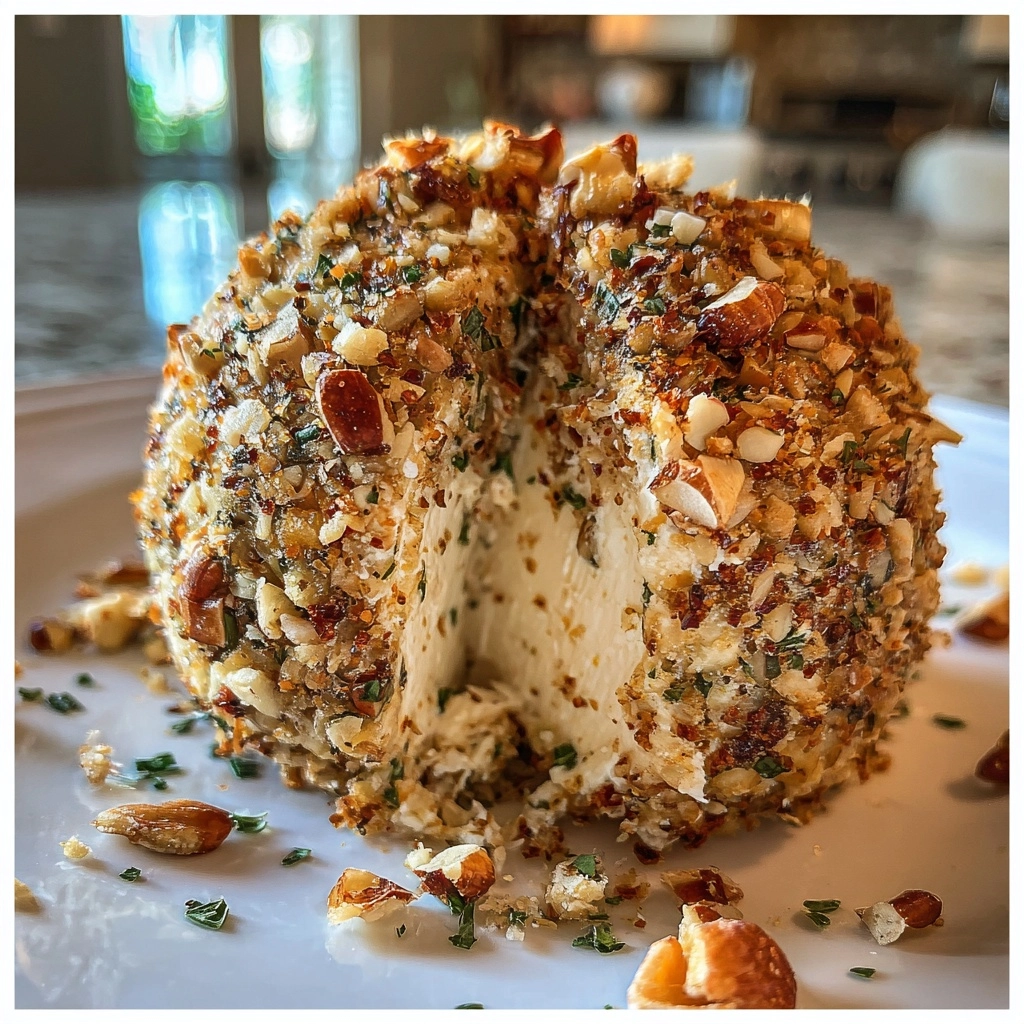
Apple Cider Cheese Ball
As the leaves turn and the air gets crisp, I find myself craving cozy gatherings with friends and family. That’s where my Apple Cider Cheese Ball comes in! This delightful appetizer is not only a quick solution for busy days but also a dish that will impress your loved ones. With its creamy texture and hints of apple cider, it captures the essence of fall in every bite. Whether you’re hosting a party or just looking for a tasty snack, this cheese ball is sure to be a hit!
Why You’ll Love This Apple Cider Cheese Ball
This Apple Cider Cheese Ball is a game-changer for busy moms and professionals alike. It’s incredibly easy to whip up, taking just 15 minutes of prep time. Plus, it’s a no-cook recipe, which means less mess and more time to enjoy with your loved ones. The combination of creamy cheese, crunchy pecans, and sweet cranberries creates a flavor explosion that will have everyone coming back for seconds. Trust me, it’s a crowd-pleaser!
Ingredients for Apple Cider Cheese Ball
Gathering the right ingredients is the first step to creating your Apple Cider Cheese Ball. Here’s what you’ll need:
- Cream cheese: This is the base of your cheese ball, providing a creamy texture that binds everything together.
- Shredded sharp cheddar cheese: It adds a rich, tangy flavor that perfectly complements the sweetness of the apple cider.
- Apple cider: The star ingredient! It infuses the cheese ball with a delightful fall flavor that’s both refreshing and nostalgic.
- Chopped pecans: These add a lovely crunch and a nutty taste, enhancing the overall texture of the cheese ball.
- Dried cranberries: Sweet and chewy, they provide a burst of flavor that balances the savory elements beautifully.
- Garlic powder: A pinch of this adds depth and a savory kick to the mix.
- Onion powder: It complements the garlic and enhances the overall flavor profile.
- Salt and black pepper: Essential for seasoning, these ingredients help to elevate all the flavors in the cheese ball.
- Fresh herbs (optional): Consider using herbs like parsley or chives for a pop of color and freshness when serving.
For those looking to switch things up, you can add a tablespoon of honey for a sweeter flavor. All ingredient quantities are listed at the bottom of the article for easy printing!
How to Make Apple Cider Cheese Ball
Creating your Apple Cider Cheese Ball is a breeze! Follow these simple steps, and you’ll have a delicious appetizer ready in no time. Let’s dive into the process!
Step 1: Combine the Cheeses
Start by taking your softened cream cheese and shredded sharp cheddar cheese. In a mixing bowl, combine them together. Use a spatula or a hand mixer to blend until the mixture is smooth and creamy. This step is crucial, as it sets the foundation for your cheese ball. The creaminess of the cheeses will create a delightful texture that everyone will love!
Step 2: Add Flavorings
Next, it’s time to infuse some flavor! Pour in the apple cider, and sprinkle in the garlic powder, onion powder, salt, and black pepper. Mix everything together until it’s well combined. The apple cider will add a sweet and tangy note, while the spices will enhance the overall taste. This step is where the magic begins, so make sure it’s blended smoothly!
Step 3: Fold in Add-ins
Now, let’s add some crunch and sweetness! Gently fold in the chopped pecans and dried cranberries into the cheese mixture. Use a spatula to ensure they’re evenly distributed throughout. The pecans will give a lovely texture, while the cranberries add a pop of color and flavor. This combination is what makes the Apple Cider Cheese Ball truly special!
Step 4: Shape and Chill
Once everything is mixed, it’s time to shape your cheese ball. Use your hands to form the mixture into a round ball. Wrap it tightly in plastic wrap and place it in the refrigerator. Let it chill for at least two hours. This step is essential for firming up the cheese ball, making it easier to serve later. Plus, the flavors will meld beautifully during this time!
Step 5: Final Touches
After chilling, it’s time for the final touches! Remove the cheese ball from the refrigerator and unwrap it. If you like, roll it in additional chopped pecans for an extra crunch. Serve it on a platter with crackers or apple slices. Garnish with fresh herbs for a beautiful presentation. Your Apple Cider Cheese Ball is now ready to impress!
Tips for Success
- Make sure your cream cheese is softened for easy mixing.
- Chill the cheese ball for at least two hours to enhance flavors.
- Feel free to experiment with different nuts or dried fruits!
- For a sweeter twist, add honey or maple syrup to the mixture.
- Use a variety of crackers for serving to add texture and flavor.
Equipment Needed
- Mixing bowl: A large bowl works best, but any bowl will do.
- Spatula or hand mixer: Use a spatula for a more hands-on approach, or a hand mixer for quick blending.
- Plastic wrap: Any food-safe wrap will suffice for chilling.
- Serving platter: A simple plate or board can showcase your cheese ball beautifully.
Variations of Apple Cider Cheese Ball
- Spicy Kick: Add a teaspoon of cayenne pepper or chopped jalapeños for a spicy twist that will wake up your taste buds.
- Herbed Delight: Mix in fresh herbs like rosemary or thyme for an aromatic flavor that complements the apple cider beautifully.
- Nut-Free Option: Substitute the pecans with sunflower seeds or omit nuts entirely for a nut-free version.
- Vegan Version: Use vegan cream cheese and nutritional yeast instead of cheddar for a plant-based alternative.
- Fruit Fusion: Incorporate chopped apples or pears into the mixture for an extra fruity flavor that enhances the fall theme.
Serving Suggestions for Apple Cider Cheese Ball
- Pair with a variety of crackers, such as whole grain or herb-flavored, for added texture.
- Serve alongside fresh apple slices for a delightful crunch that complements the cheese ball.
- Offer a selection of beverages like apple cider or a light white wine to enhance the flavors.
- Garnish with fresh herbs like parsley or chives for a pop of color and freshness.
FAQs about Apple Cider Cheese Ball
Can I make the Apple Cider Cheese Ball in advance?
Absolutely! This cheese ball can be made a day in advance. Just wrap it tightly in plastic wrap and store it in the refrigerator. This allows the flavors to meld beautifully, making it even tastier when you serve it!
What can I serve with the Apple Cider Cheese Ball?
Pair your cheese ball with a variety of crackers, fresh apple slices, or even pretzels. The crunchy textures complement the creamy cheese ball perfectly. You can also serve it with a light white wine or apple cider for a delightful pairing.
How long will the Apple Cider Cheese Ball last in the fridge?
When stored in an airtight container, your cheese ball will last about 3 to 5 days in the refrigerator. Just make sure to keep it covered to maintain its freshness!
Can I customize the ingredients in the cheese ball?
Definitely! Feel free to experiment with different nuts, dried fruits, or even spices. You can add a spicy kick with jalapeños or make it sweeter with honey. The possibilities are endless!
Is this recipe suitable for vegetarians?
Yes, this Apple Cider Cheese Ball is vegetarian-friendly! It’s a great option for gatherings, ensuring everyone can enjoy this delicious appetizer.
Summarizing the Joy of Apple Cider Cheese Ball
Creating an Apple Cider Cheese Ball is more than just making a dish; it’s about bringing people together. The delightful blend of flavors and textures captures the essence of fall, making every bite a celebration. Whether it’s a cozy family gathering or a festive party, this cheese ball sparks joy and conversation. Plus, it’s a simple recipe that fits perfectly into our busy lives. So, roll up your sleeves, gather your loved ones, and enjoy the warmth and happiness that this delicious appetizer brings to your table. Trust me, it’s a memory in the making!
PrintApple Cider Cheese Ball: A Must-Try Fall Recipe!
A delicious and festive cheese ball infused with the flavors of apple cider, perfect for fall gatherings.
- Prep Time: 15 minutes
- Cook Time: 0 minutes
- Total Time: 2 hours 15 minutes
- Yield: 8 servings
- Category: Appetizer
- Method: No-Cook
- Cuisine: American
- Diet: Vegetarian
Ingredients
- 8 oz cream cheese, softened
- 1 cup shredded sharp cheddar cheese
- 1/2 cup apple cider
- 1/4 cup chopped pecans
- 1/4 cup dried cranberries, chopped
- 1 tsp garlic powder
- 1 tsp onion powder
- 1/2 tsp salt
- 1/2 tsp black pepper
- Fresh herbs for garnish (optional)
Instructions
- In a mixing bowl, combine the softened cream cheese and shredded cheddar cheese until well blended.
- Add the apple cider, garlic powder, onion powder, salt, and black pepper. Mix until smooth.
- Fold in the chopped pecans and dried cranberries.
- Shape the mixture into a ball and wrap it in plastic wrap. Refrigerate for at least 2 hours to firm up.
- Once chilled, remove from the refrigerator and roll the cheese ball in additional chopped pecans if desired.
- Serve with crackers or apple slices and garnish with fresh herbs.
Notes
- For a sweeter flavor, consider adding a tablespoon of honey.
- This cheese ball can be made a day in advance for convenience.
- Store leftovers in an airtight container in the refrigerator.