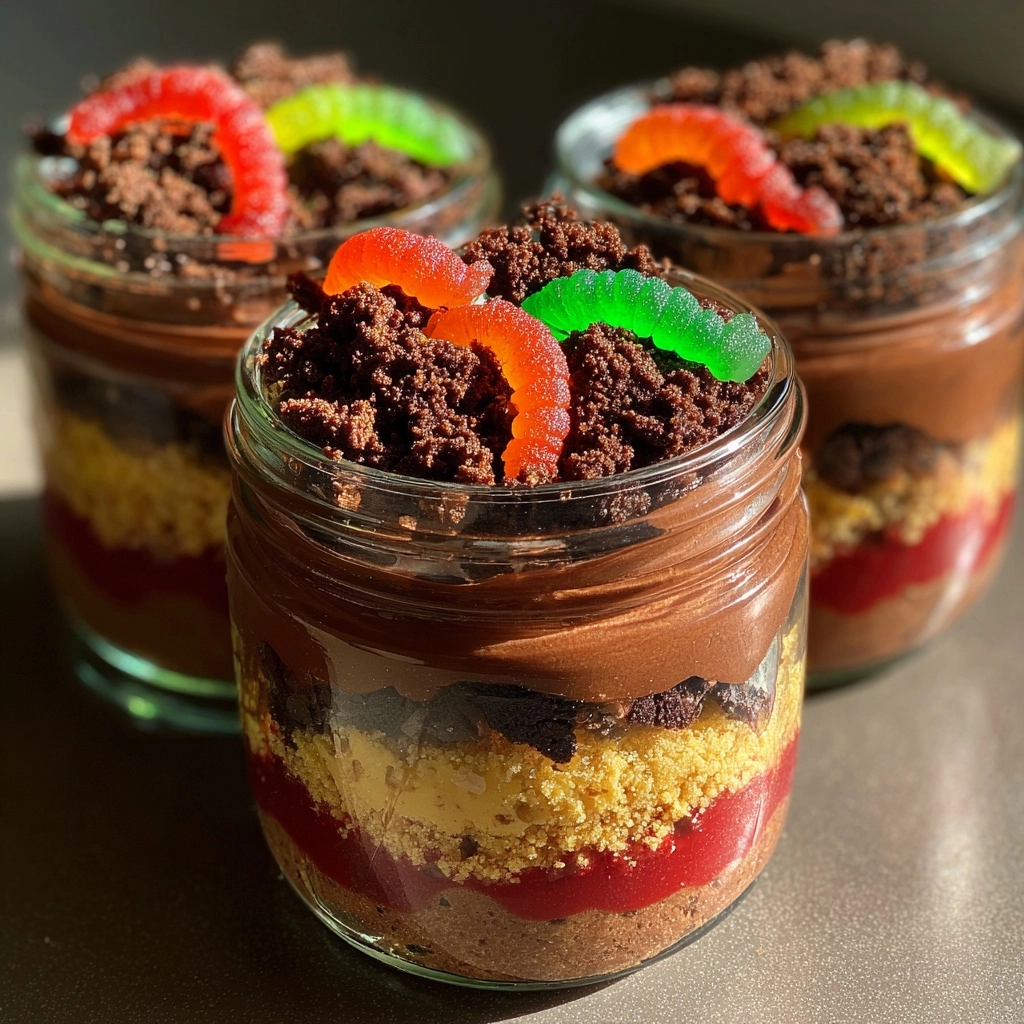
Halloween Dirt Cups
As the leaves turn and the air gets crisp, I find myself dreaming of spooky treats that bring a smile to my family’s faces. Halloween Dirt Cups are just that—a delightful, no-bake dessert that’s as fun to make as it is to eat! With layers of creamy chocolate pudding, crunchy crushed cookies, and squiggly gummy worms, these cups are a hit at any Halloween gathering. They’re perfect for busy moms like us, offering a quick solution for a festive dessert that impresses without the fuss. Trust me, your loved ones will be begging for seconds!
Why You’ll Love This Halloween Dirt Cups
These Halloween Dirt Cups are a lifesaver for busy days! They come together in just 15 minutes, making them a quick and easy treat. The rich chocolate flavor paired with the crunch of Oreo cookies is simply irresistible. Plus, kids love the fun of digging through the layers to find gummy worms. It’s a dessert that brings joy and laughter, perfect for creating memorable moments with your family!
Ingredients for Halloween Dirt Cups
Gathering the right ingredients is half the fun! Here’s what you’ll need to whip up these delightful Halloween Dirt Cups:
- Chocolate pudding mix: This is the star of the show, providing that rich, creamy base that everyone loves.
- Milk: Essential for mixing with the pudding mix to create that smooth texture. You can use any type of milk you prefer!
- Oreo cookies: Crushed to create a crunchy layer that mimics dirt. Feel free to experiment with other chocolate cookies if you want a twist!
- Gummy worms: These add a playful touch, making your dessert look spooky and fun. You can also use other gummy candies if you like.
- Whipped cream (optional): A dollop on top adds a creamy finish and makes it look extra festive. You can use store-bought or homemade!
For those who want to get creative, consider adding Halloween-themed sprinkles or candy corn for an extra festive flair. All ingredient quantities are listed at the bottom of the article for easy printing. Happy cooking!
How to Make Halloween Dirt Cups
Making Halloween Dirt Cups is a breeze! Follow these simple steps, and you’ll have a spooky dessert ready in no time. Let’s dive into the fun!
Step 1: Prepare the Pudding
Start by whisking together the chocolate pudding mix and milk in a bowl. I like to use a whisk for a smooth consistency. It’s like a mini workout for your arm!
Once mixed, let the pudding sit for about 5 minutes. This allows it to thicken up nicely. You’ll want it to be creamy and luscious, perfect for layering.
Step 2: Layer the Ingredients
Now comes the fun part! Grab your clear cups and start layering. Begin with a generous scoop of chocolate pudding at the bottom. It’s like laying the foundation for a spooky dessert masterpiece!
Next, sprinkle a layer of crushed Oreo cookies on top. This mimics the look of dirt and adds a delightful crunch. Repeat the layers until you reach the top of the cup, finishing with pudding.
Step 3: Add the Toppings
Time to get creative! Top your cups with gummy worms, letting them peek out like they’re crawling through the dirt. It’s a fun touch that kids absolutely love!
If you’re feeling extra festive, add a dollop of whipped cream on top. It makes the dessert look even more inviting. You can also sprinkle some Halloween-themed decorations for that extra flair!
Step 4: Chill and Serve
Once your cups are assembled, pop them in the refrigerator for at least 30 minutes. This chilling time allows the flavors to meld together beautifully.
When you’re ready to serve, pull them out and watch the smiles light up! These Halloween Dirt Cups are not just a treat; they’re a delightful experience for everyone!
Tips for Success
- Use clear cups to showcase the fun layers—it’s all about the presentation!
- Chill the cups longer if you can; it enhances the flavors and texture.
- For a richer taste, try using whole milk or even chocolate milk.
- Get the kids involved! Let them help with layering and adding toppings.
- Make a double batch for parties; these cups disappear fast!
Equipment Needed
- Mixing bowl: A medium-sized bowl works best for mixing the pudding.
- Whisk: Use a whisk for smooth pudding; a fork can work in a pinch!
- Clear cups: Any clear cups will do; mason jars add a rustic touch!
- Spoon: A regular spoon is perfect for layering and serving.
Variations of Halloween Dirt Cups
- Chocolate Mint Dirt Cups: Add a few drops of mint extract to the pudding for a refreshing twist. Top with mint-flavored gummy worms for extra fun!
- Peanut Butter Delight: Mix in some creamy peanut butter with the pudding for a nutty flavor. Use crushed peanut butter cookies instead of Oreos for a delicious variation.
- Vegan Option: Substitute the chocolate pudding mix with a vegan version and use almond or coconut milk. Replace whipped cream with coconut whipped cream for a dairy-free treat!
- Fruit Layer: Add a layer of mashed bananas or strawberries between the pudding and cookies for a fruity surprise. It adds a fresh taste to the dessert!
- Gluten-Free Version: Use gluten-free chocolate pudding mix and gluten-free cookies to make this dessert suitable for those with dietary restrictions.
Serving Suggestions for Halloween Dirt Cups
- Pair with spooky-themed cupcakes for a festive dessert table.
- Serve alongside a punch made with orange soda and sherbet for a fun drink.
- Garnish with Halloween-themed napkins and plates to enhance the spooky vibe.
- Consider adding a few decorative plastic spiders for an extra fright!
FAQs about Halloween Dirt Cups
As I’ve shared my love for Halloween Dirt Cups, I often get questions from fellow home cooks. Here are some of the most common queries, along with my answers to help you create the perfect spooky treat!
Can I make Halloween Dirt Cups in advance?
Absolutely! These cups can be made a day ahead. Just store them in the refrigerator until you’re ready to serve. This actually enhances the flavors!
What can I use instead of gummy worms?
If gummy worms aren’t your thing, feel free to use other gummy candies or even chocolate spiders. The goal is to keep it fun and festive!
How long do Halloween Dirt Cups last in the fridge?
They’ll stay fresh for about 2-3 days in the refrigerator. Just make sure they’re covered to keep them from drying out.
Can I use homemade pudding instead of a mix?
Of course! If you have a favorite homemade chocolate pudding recipe, go for it. Just ensure it’s thick enough to layer well.
Are Halloween Dirt Cups suitable for kids with allergies?
To accommodate allergies, check the labels on your pudding mix and cookies. You can easily make gluten-free or nut-free versions with the right substitutions!
Summarizing the Joy of Halloween Dirt Cups
Creating Halloween Dirt Cups is more than just making a dessert; it’s about crafting memories with your loved ones. The laughter that fills the kitchen as you layer the ingredients, the excitement on your kids’ faces when they spot the gummy worms, and the joy of sharing these spooky treats at gatherings are priceless. These cups are a delightful blend of simplicity and fun, making them the perfect addition to your Halloween festivities. So, roll up your sleeves, gather your ingredients, and let the magic of Halloween Dirt Cups bring smiles to your family this season!
PrintHalloween Dirt Cups: A Spooky Treat to Impress!
Halloween Dirt Cups are a fun and spooky dessert made with layers of chocolate pudding, crushed cookies, and gummy worms, perfect for Halloween parties.
- Prep Time: 15 minutes
- Cook Time: 0 minutes
- Total Time: 45 minutes (including chilling time)
- Yield: 4 servings
- Category: Dessert
- Method: No-bake
- Cuisine: American
- Diet: Vegetarian
Ingredients
- 1 package chocolate pudding mix
- 2 cups milk
- 1 package Oreo cookies, crushed
- Gummy worms
- Whipped cream (optional)
Instructions
- In a bowl, whisk together the chocolate pudding mix and milk until smooth.
- Let the pudding sit for 5 minutes to thicken.
- In clear cups, layer the chocolate pudding and crushed Oreo cookies.
- Top with gummy worms and whipped cream if desired.
- Chill in the refrigerator for at least 30 minutes before serving.
Notes
- For a more festive look, use Halloween-themed cups.
- Feel free to add other toppings like candy corn or sprinkles.
- Can be made a day in advance and stored in the refrigerator.